To use the AVED Photo Organizer you will need three pieces of software: Java 1.5, Java Advanced Imaging, and the Photo Organizer .jar file.
Java 1.5+
First, check what version of Java you have by going to this page. On that page you should see something to the effect of "Congratulations, the latest version is installed on your system". On this page please confirm that where "version" is listed, the version number is 1.5.0 or higher. If not, you'll need to get java (clicking the "download now" button should be sufficient).
Java Advanced Imaging IO
This software is required to view the .ppm image format used within the AVED project. If this is not installed a message will be shown to you when starting up the photo organizer application instructing you to install it. So, it is best to try to start the Photo Organizer first, before installing this. To install, go to this page
https://jai-imageio.dev.java.net/binary-builds.html
and find the most recent stable release for your platform. Within your platform selections, choose the file taht ends with "jre" if you have a normal java installation. If you are using the JDK, you'll need to download and install the file ending with "jdk". After downloading, installation will vary depending on your operating system. For windows users, double-clicking on the .exe file should be sufficient.
The AVED Photo Organizer .jar
This is the easy part. The jar file that runs the photo organizer can be downloaded from this link.
Once the file has been downloaded, you can start the application using two different methods:
- From the command line This is the recommended method, since any problems in the program will be reported to the command line (and problems aren't unlikely). Type: "java -jar aved-organizer-20070123.jar" (the data in the name of the file may be different)
- From a graphical inteface This point and click method is easier, but there is some risk that errors may occur and you won't know of them (caveat emptor). If Java is properly installed, double clicking on the aved-organizer .jar file will launch the program.
Photo Organizer Tutorial
The photo organizer should look something like this when it first starts:
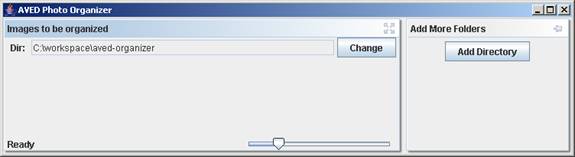
There is currently very little to do with the program, here are the main pieces as this point:
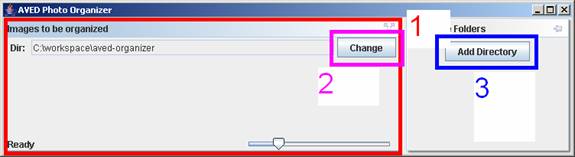
- This is the area where you will view the main directory of images that needs to be sorted.
- Clicking this button will bring up a file explorer window that will let you pick the directory of files you want to view. This is probably the first thing you’ll want to do.
- This button is what you use to add destination directories, the places you’ll be dragging images to.
Now, let’s pick a directory of images using button 1.
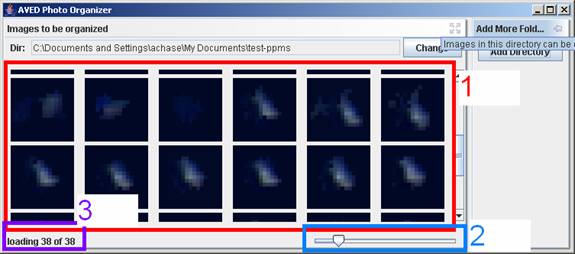
- Displayed here is every file in the chosen directory that is recognized as an image.
- Moving this slider left or right will make the images smaller or larger (respectively).
- This shows how many of the images were successfully loaded. If, after loading, the two numbers are not equal, a bug has probably occurred in the program. If this number is other than what you expected, the file extension of the images you were trying to look at were not on the list of known file types (current accepted extensions are: .ppm, .jpg, .gif, .png, .tif, .tiff, .pnm, .bmp)
Now let’s use the "Add Directory" button to add a couple of destination directories:
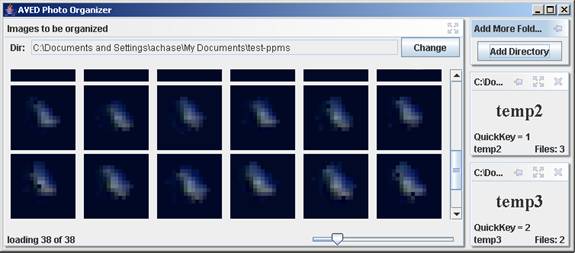
Here’s an annotated view to explain what’s going on:
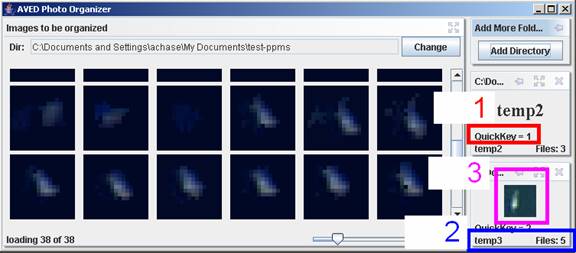
- Up to 9 destination directories can have a quick key associated with them. To use quick keys, hold down the quick key for the folder you want to move images to and then click on each image you want to move. Each image clicked on will be moved to the directory designated by the quick key without having to drag it over.
- This is status information about the directory, the directory name, and the number of image files it contains. You should see the file count of a directory increment when images are dragged (or quick keyed) to it.
- This is an image of the last image that was moved to the destination directory. Between the two screenshots, an image was dragged to this directory to illustrate this feature.
That’s it; you should now be on your way to organizing directories of images.
Implementation Notes:
The photo organizer should run fine either standalone, or within a larger application as an embedded component. To build a copy of the standalone jar from source, use Ant with the build.xml file that is in the projects root directory. The ‘jar’ target is the default target, so from within the root directory the command ‘ant’ will build a new jar, which can be found in the $root/build directory.
All code is in the package "org.mbari.aved.photo_organizer".
There are several improvements that could be made to the application:
There is no paging going on when loading a directory of images. All images are loaded into memory when a directory is opened in the photo viewing window. With enough images in a directory, this will cause an error in java. To increase the number of images allowed before memory runs out you can change the amount of memory allotted to the JVM by passing the arguments "-Xmx256m -Xms256m" when launching the program (e.g.: >$ java -jar -Xmx256m -Xms256m aved-organizer.jar.
There is no multiple selection mode for dragging images. This would take a decent amount of extra coding to implement and was therefore left out. To help offset that, the quick key feature was implemented.
User configuration is not maintained between sessions. This is another task that was left out due to lack of time. It would probably require about one full day to implement.
There is no image caching going on. For instance, when an image is moved to a destination directory, the image that shows up in the destination directory is being re-read from disk.
Images are read at full resolution despite being shown as thumbnails. They are also stored in memory at full resolution to allow for easy resizing. With small .ppm files this shouldn’t really be a problem, but if larger files are used in the future this should probably be changed.