Hole panel
The Hole function panel automates the creation and editing of holes in solids, saving you from creating circles and extruding them. Use the Hole Style tab to set the Style, Type, and Size. You can create a cylinder or one of the following hole styles:
- Simple
- Counterbore
- Countersink
- Threaded
- Taper
- Custom
Selecting a Style adjusts the Hole Properties available for you to edit.
Hole Properties allows for view only parameters when an Industry standard library is selected. Switching to User Defined opens all parameters for you to edit.
 How do I create a User Library?
-
Open the User Library drop-down in the Hole Style tab.
-
Click the green plus button to create a library.

-
Name your library and press OK.
You can save commonly used holes in a library that you can use in future sessions of Mastercam. Mastercam converts hole dimensions stored in the library into the part's current unit of measurement (U.S. to metric, or metric to U.S.).
To save a custom hole into a library
- Switch to User defined under Mode.

- Adjust the Hole Properties and Depth to your desired parameters.
-
Open the User Library dropdown and press the green plus underneath the Presets graph.
-
Name the hole, and choose a library to store it in. Click OK.

To apply a preset hole dimension to a position
In addition to your own custom library, the Hole function includes categories of commonly used hole dimensions. Use the following procedure to apply any of these industry standard presets to your solid.
- Start the Hole function.
- Choose a Plane Orientation.
- Select one or more positions, then press [Enter].
- Select the library you want to choose hole presets from.
-
Move to the Hole Style tab, select a Style, Type, and Size.

Every drop-down will show you a range of commonly used hole presets with parameters already set.
How do I create a custom hole?
Creating a custom hole is much like creating other types of holes. However, a custom hole is multi-segmented, with each segment having different attributes. The segments allow more complex holes that can be created with the other types.
When you choose a hole style in a Custom hole, a list of hole attributes displays, as shown in the following image. Each segment listed shows the order of your hole. For each segment, you can adjust different parameters. You can add and adjust Straight, Taper, Threaded, and Tip to your custom hole. To add a segment, click the plus-sign button in the lower right as shown in the image below.
You can also right-click to the left over the grid to expose a pop-up menu with options for moving, adding, and deleting segments.

How do I move or copy solid hole operations?
The Hole panel allows you to move or copy holes to create new hole operations from existing ones. Suppose you have a bolt circle of eight holes (see the following image) that you want to divide into two operations of four holes each. The following procedure shows how to complete that task.
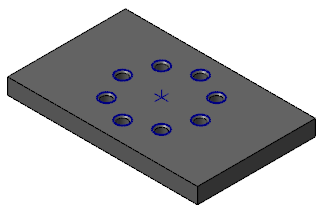
-
In the Solids Manager, double-click the hole operation that you want to divide.
-
In the Hole panel, select the holes to move to a new operation. In the following image on the left, you can see that the user has selected every other hole, starting with the first. Mastercam highlights the selected holes, as shown in the image on the right.
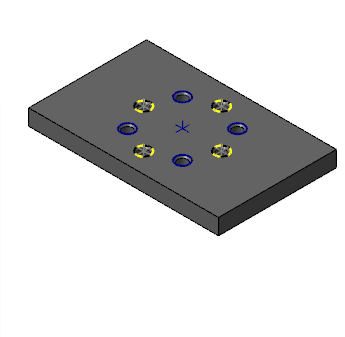
-
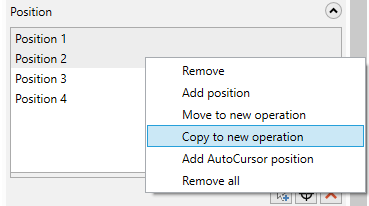
Right-click one of the selected holes, and choose Move to new operation.
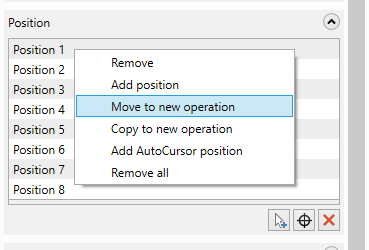
Mastercam moves the four selected holes into a new hole operation. The selected holes vanish from the Position list and in the graphics window, as they are no longer part of this operation.
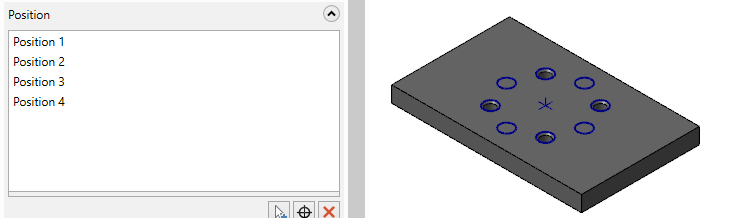
-
Click OK in the Hole panel, return to the Solids Manager, and click Regen. You now have two sets of four holes that you can edit independently.
Copying holes to new operations works the same way, except after selecting the holes, you choose Copy to new operation. Mastercam then creates a new operation with the selected holes, while leaving the original operation intact.
Can I break the edge of a hole?
If you need to apply an edge treatment to your hole to satisfy the design or manufacturing intent, you can use the Hole panel's edge treatment options to easily break hole edges in your solid parts. The parameters here create either chamfers or fillets on your hole edge, and control the size of the chamfer by specifying either its diameter or its width.
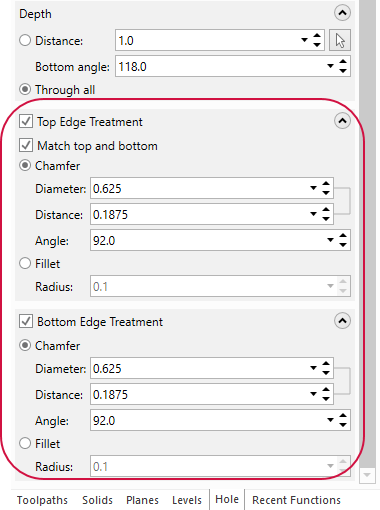
Additionally, you can smooth the bottom edges of through holes. Select the Match top and bottom option to apply your top edge treatment settings to your bottom edge or enter specific values into the Bottom Edge Treatment section in the function panel to create these dimensions independently.
Edge treatments on some hole types are limited.
-
You cannot customize the top edge of a countersink hole.
-
You cannot modify the diameter of the bottom edge of a tapered hole.


