Using Viewsheets
Use viewsheets to create different part views, each on its own tab. When you save your part file, Mastercam stores the viewsheet settings along with the part.
Viewsheets save time and make viewing large parts easier. You can set up multiple viewsheets for a part and toggle between them, instead of manipulating the part each time you want a different view.
With a viewsheet you can:
- Define a specific view or plane orientation and scale, including a section view
- Store modified level settings
- Use a bookmark to define a restorable viewsheet state
Files with multiple viewsheets that were created prior to Mastercam 2020 will open with all viewsheets open.
 How do I display and adjust viewsheets
Displaying Viewsheets in Mastercam
To enable viewsheets, select On/Off on the View tab.

A viewsheet tab displays at the bottom of Mastercam's window, as shown below.
If you turn viewsheets On in a part file where a user has previously added viewsheets to the part, you may see multiple viewsheet tabs
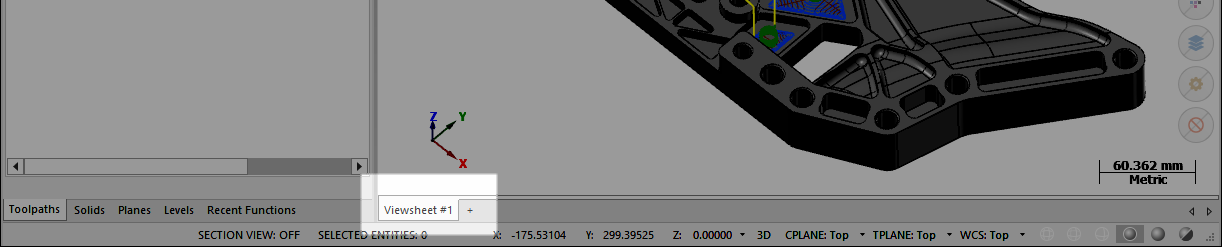
This is the main view of your part. You can adjust the main view, but you cannot delete it.
Adjusting Part Views and Toggling Viewsheets
You can adjust the part view of the active viewsheet. To make a viewsheet active, select the viewsheet tab. One viewsheet is active at a time in Mastercam. The active viewsheet displays its name in bold text.
Try the following exercise to practice adjusting the part view, as well as toggling between different viewsheets:
- Load a part file into Mastercam.
- To display viewsheets, select On/Off on the View tab.
- Right-click the Viewsheet #1 tab, and select New viewsheet from the menu.
- Type a new name, such as IsometricView, and press [Enter].
- Click the new viewsheet tab to make it active.
- Change to a different view. For example, press [Alt+7] to switch to the isometric view.
- Click the viewsheet tabs to switch between the two views.
How do I create, copy, rename, or delete a viewsheet?
There are two ways to access the basic viewsheet functions:
-
Select a command from the New drop-down on the View tab of the ribbon.
-
Right-click on an existing viewsheet tab at the bottom of the Mastercam window.
You can also create a viewsheet by clicking the + button to the right of the current viewsheets.
Some of the basic functions can apply to multiple viewsheets at once. Hold the [Ctrl] key and select the viewsheets. Then, right-click on any selected viewsheet and choose an option.
When and how do I use viewsheet groups?
Use viewsheet groups to gather viewsheets into a single unit for organizational purposes and to reduce on-screen clutter. Groups make working with viewsheets easier: You can give groups specific names, add a color to viewsheets in a group, and collapse or expand group folders.
Hold the [Ctrl] key to select multiple viewsheets to group or ungroup at once.
Creating a Viewsheet Group
To create a viewsheet group:
-
Right-click on the viewsheet you want to group.
-
Select New Group from the Group drop-down. Mastercam opens the Create Viewsheet Group dialog box.
-
Name the group and select a group color.
-
Click OK. The group tab appears, expanded, at the bottom of the Mastercam screen. All viewsheets within the group are the same color.

Adding Viewsheets to an Existing Group
There are two ways to add a viewsheet to an existing group.
Use the right-click method:
-
Right-click on the viewsheet you want to group.
-
From the Group drop-down, select the existing group to which to add the viewsheets.
Use the drag-and-drop method:
-
Select the viewsheet you want to group.
-
Hold down the left-click button and drag the viewsheet between items in the existing group.
-
Release the left-click button. The viewsheet is part of the group.
Removing Viewsheets from a Group
To remove a viewsheet from a group, right-click on the viewsheet and select Ungroup.
You can also hold the left mouse button and drag the viewsheet outside of the group, or into another group.
Expanding and Collapsing Groups
Viewsheet groups expand to display all viewsheets within the group, or collapse to hide all viewsheets within the group.
Click the group tab to expand or collapse the group. The icon on the group tab changes based on the status of the group:
-
An open folder icon represents an expanded group.

-
A closed folder icon represents a collapsed group.

Deleting a Viewsheet Group
To delete a viewsheet group, right-click on the group tab and select Delete.
Mastercam prompts you to keep the viewsheets that are in the group, or to delete the viewsheets and the group.
If you choose to keep the viewsheets within the group, they return to the bottom of the Mastercam window as ungrouped viewsheets.
Editing Viewsheet Group Properties
Right-click on a group tab to rename, copy, delete or change the color of a viewsheet group.
You can edit the viewsheet default settings in the Screen, Viewsheets page of the System Configuration dialog box.
What are bookmarks and how do I use them?
Bookmarks allow you to save a specific view on a viewsheet, and then restore that view at any time.
Try the following exercise to practice creating a bookmark and then restoring the bookmarked view:
- Load a part file into Mastercam.
- To display viewsheets, select On/Off on the View tab.
-
Right-click a viewsheet tab, and select New viewsheet from the right-click menu.
Mastercam creates a new viewsheet tab for your part.
- Type a name for the viewsheet, and press [Enter].
- Set the part's view, scaling, and level settings as you need them.
-
Right-click the viewsheet tab, and select Save viewsheet as bookmark from the pop-up menu, or select Save Bookmark on the View tab.
Mastercam saves the part's current view, scaling, and level settings as a bookmark. A bookmark indicator appears on the tab.
- Change the part view, scale, and/or level settings however you like.
-
Right-click the tab, and select Restore from viewsheet bookmark, or select Restore Bookmark from the View tab.
Mastercam restores the settings you saved in Step 6 as long as those settings are selected on the Viewsheet page in System Configuration. Right-click the tab, and choose Settings to verify they are active. Double-clicking the tab will also restore the bookmark.
- To delete the bookmark, right-click the tab, and choose Delete viewsheet bookmark, or select Delete from the New drop-down on the View, Viewsheets menu.
Each viewsheet has a single bookmark. When you save your part file, Mastercam stores the viewsheet settings (including the bookmark) along with the part.


