Deploying a model in the Elastic Container Service
The elastic video processing stack manages the deployment of a model in the Elastic Container Service (ECS). This stack is designed to be used with the ecsprocess command. These instructions assume that you have already trained a model using the train command and know the location of that model in S3. If you have not trained a model, see the train command for more information.
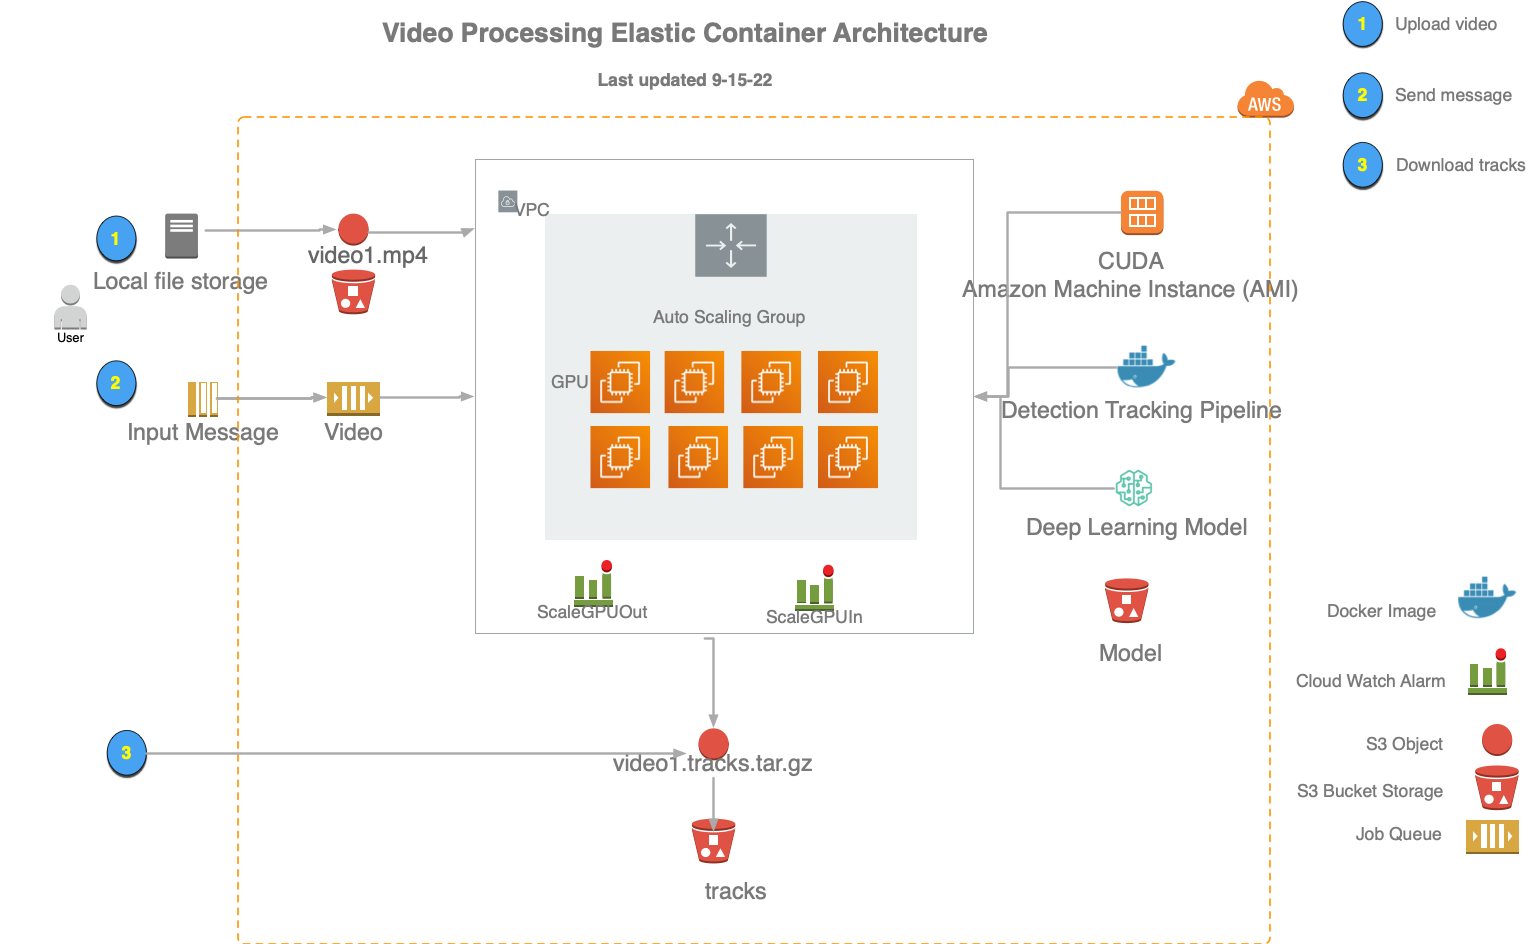
Architecture
The architecture of the elastic video processing stack includes:
- A cloud watch alarm that triggers the auto scaling based on number of videos in a SQQ queue.
- An autoscaling ECS cluster optimized for fast spin-up and fast spin-down of computing resources.
When the ecsprocess command is executed, video is uploaded to a S3 bucket then a message is sent to a video SQS queue. Messages are sent as soon as each video is successfully uploaded. This triggers a cloud watch alarm to start scaling up the ECS cluster. The ECS cluster will start mulitple tasks to process the video, and these tasks will continue to process as long as videos messages are in the queue. When the queue is empty, the container will stop processing and the ECS cluster will scale down, removing resources to save costs. Results are stored in a S3 bucket as a .tracks.tar.gz file which can be downloaded and analyzed.
[click image below to see larger example]
Deploying a new model
The following is the YAML formatting that describes the model.
- The StackName is the name of the stack that will be created in the cloud formation console. This name must be unique and will be used with the ecsprocess command, e.g. --cluster Megadetector.
- The TaskDefinition is the name of the ECS task definition that will be created.
- The ContainerImage is the location of the docker image that will be deployed. This corresponds to the docker image that was uploaded with the setup --mirror command.
- The FleetSize is the number of CUDA enabled Amazon Machine Instances that will be deployed. This is limited to whatever quota you have requested in your account.
- The BlockDeviceVolumeGBRoot is the size of the EBS volume that will be attached to the instance. This is used to store the video, model and the results. Make sure this is large enough for your video and model.
- The TimeoutHours is the maximum time that the task will run. This is used to stop the task if it is taking too long. This is useful to prevent runaway tasks from running up costs. Set this to a reasonable value for your video size and model.
Example YAML file
Create a .yaml file with this content, e.g. megadetector.yaml in the current directory.
Info
Note that the StackName cannot start with a number, and be sure to replace the account number 168552337187 with your account number.
Comment: This stack deploys the Megadetector YOLOv5 model
StackName: Megadetector
TaskDefinition: strongsort-yolov5
ContainerImage: 168552337187.dkr.ecr.us-west-2.amazonaws.com/mbari/strongsort-yolov5:1.10.0
FleetSize: 1
BlockDeviceVolumeGBRoot: 10
TimeoutHours: 2
model_location: s3://deepsea-ai-168552337187-models/Megadetector.pt
track_config: s3://deepsea-ai-168552337187-track-conf/strong_sort_benthic.yaml
Then deploy the stack with the following command:
Deploy with the YAML file and save the stack output
Deploy and save the stack output to a directory, e.g. to directory named stacks/megadetector:
First create the directory to save the stack output. This just captures the cloud formation output and is useful for debugging.
mkdir -p stacks/megadetector
stacks/megadetector:
Info
Note that your AWS credentials must be setup in the ~/.aws/credentials file. See the AWS CLI documentation for more information.
docker run -v $PWD:/data \
            -v $HOME/.aws/credentials:/home/docker_user/.aws/credentials \
            mbari/ecs-autoscale \
            /data/megadetector.yaml \
            /data/stacks/megadetector
Updated: 2024-08-14