Mission Tab
Mission tab
Per our roadmap, the recently released version 4 includes an overhauled implementation of the Mission tab.
Once a mission script has been selected and some parameters overwritten, the new Mission tab contents looks like this:

Some new features to highlight:
-
Parameters are now grouped into collapsible sections: a "main" section with the parameters defined in the mission script itself; and one section per "insert" including the corresponding parameters.
-
There's now a header line showing the number of parameters overridden, and a toggle button to only show the overridden parameters in the sections.
-
There's now a button to only expand sections having modified parameters, and buttons to expand or collapse all sections.
-
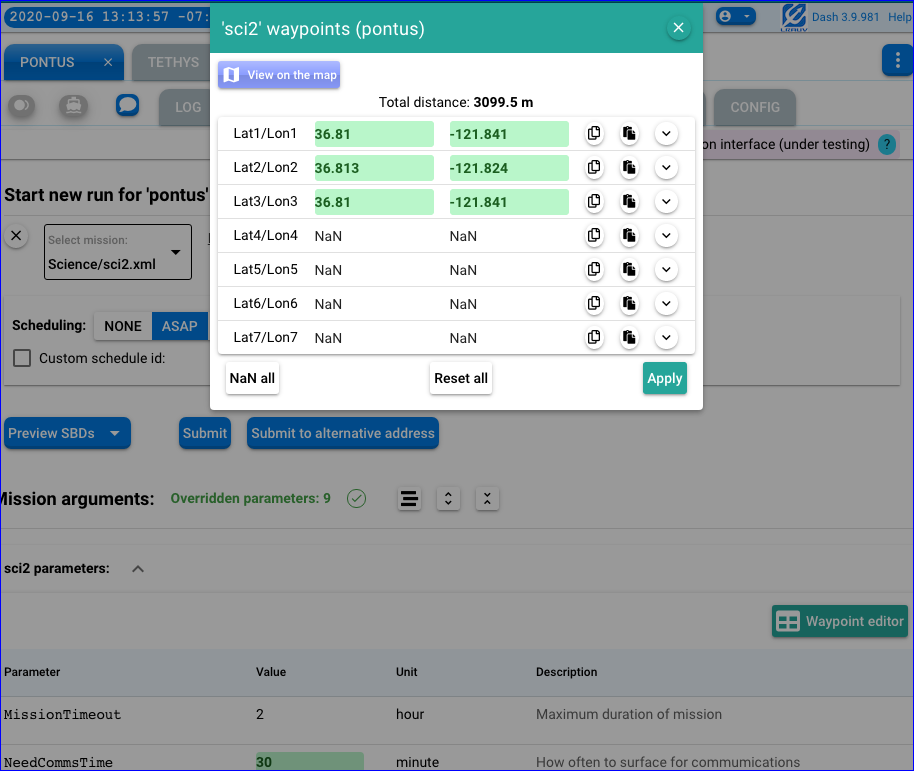
There's also a new "Waypoint editor" button that will be available in a section having parameter names that resemble Latitude/Longitude pairs, and with
degreeas unit. In the screenshot above, these are: Lat1/Lon1, Lat2/Lon2, etc. (The recognition of such parameters uses the same logic as that used for the display of waypoint trajectories in regular operations.) Click this button to open the new "smart" editor as described below. -
In general, the editing of a parameter value or its associated unit now allows to "revert" to the default value or unit as defined in the mission script (button "Reset").
Waypoint Editor
This is a dialog that looks like this:
Latitude/Longitude parameter pairs are gathered together as a basis for a more consistent and less error-prone waypoint specification for the mission.
Beside manually entering the coordinates in the fields, there are buttons to:
-
perform copy and paste actions (against system clipboard) in each row. This is a "smart" operation in that the pair latitude,longitude is handled as a unit in the copy or paste action (the parts will be automatically associated with corresponding fields);
-
a dropdown per row that allows to select the position from a number of sources:
- Specify 'NaN' for (both pieces of) the position, or select from the default value
- Select from the current set of markers on the map
- Select from the list of stations

-
a button to set all rows to NaN
-
a button to reset all positions to the default values as defined in the mission script.
The Waypoint editor dialog also shows:
- Total distance
-
The tooltip for a row containing a non-NaN waypoint shows:
- Depth at the particular position (*)
- Distance increment wrt immediately preceding (non-NaN) waypoint
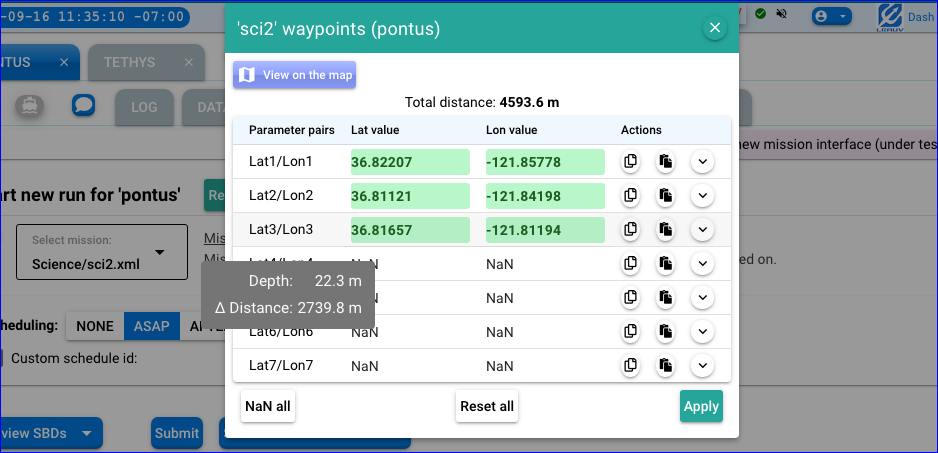
(*) Assuming appropriate configuration in TethysDash backend related with Google APIs.
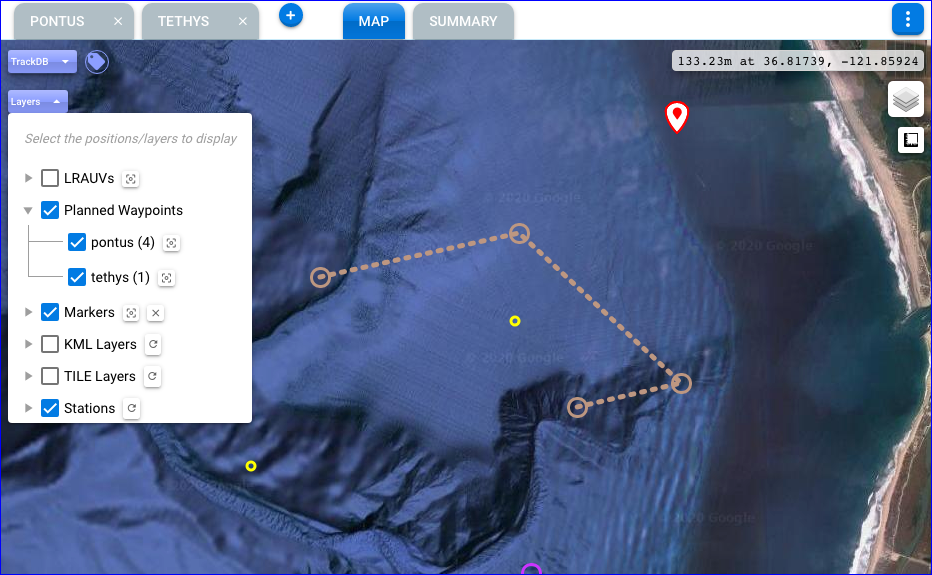
There's also a "View on the map" button at the top of dialog that allows switching to the Map tab while still keeping the dialog open there:

- The waypoint trajectory is automatically highlighted/focused.
-
Similar highlight effect is obtained when hovering the mouse on the "zoom-to-all" button in the dialog, or when tapping it on a mobile device.
-
Waypoints can be dragged directly on the map while the waypoint editor for the corresponding vehicle is open. Waypoint coordinates and total distance are immediately reflected in the dialog.
The usual 'Layers' dropdown on the map will include a "Planned Waypoints" section with the planned missions, one per vehicle.
Note
These planned waypoints are only retained until the mission is submitted.
Finally, the button at the top of the dialog will allow returning to the Mission tab to complete the entry of any other parameters, indicate mission scheduling and do the submission itself.
Related tracker entries: td#59, td#61, dash#23, dash#45 dash#68