Adding a New Device
These instructions walk you through setting up a new RockPi S for use on a FIDO sampler. To do this, you will need to install a version of the READI-Net operating system and applications on your RockPi device which will serve as the controller for FIDO.
Note
If you need to build a new SD card image, see the instructions here
- Download the latest .img file from the
mbari-readinet-imagesS3 bucket. Note that you will have to have an AWS login account with access to the account with this S3 bucket. If you don't, check with the FIDO team for help or they can get you the image directly. -
This SD card image can be run directly as is, but it's better to run a script to change the image so you can set the device's ID and the uplink WiFi settings before installing it in the RockPi. To do this, check out the readinet code repository onto a Linux machine (Ubuntu has been tested). Download the SD image somewhere on your Linux machine and then open a terminal and change into the readinet repository, then into the
osdirectory. There is a script calledset-device-vars.shand you can run it like this:sudo set-device-vars.sh --id <DEVICE_ID> --ssid <SSID> --psk <PSK> --path </path/to/image.img> -
Where:
<DEVICE_ID>is some identifier that the FIDO sampler will be known by. A convention that has been used is 'FIDO-XXX' where XXX is the device number, like 001.<SSID>is the name of the WiFi network FIDO will be connecting to as an uplink to the internet and the cloud server<PSK>is the WiFi password.</path/to/image.img>is the absolute (full) path the .img that you downloaded from S3.
- This script will mount the image and make changes to files to customize that image for your instrument
-
You can run the image on the RockPi in two different ways, depending on which RockPi you have.
- No eMMC (SD Card only):
- If your RockPi does not have any (or enough) on-board flash (eMMC), you will need to use an SD card directly.
- Insert your SD card into your computer and copy the .img to the SD card.
- For a graphical experience, use Balena Etcher
- For a text-based experience, use the
ddcommand
- Insert the SD Card into the RockPi and power the device on
- eMMC RockPi
-
For RockPis that have enough eMMC, it is recommended that you install the image directly to the eMMC for more reliability and performance
- On your Linux host, open a terminal and change to a location where you can checkout the code for a utility to write to the RockPi eMMC
- Run
sudo apt-get install libudev-dev libusb-1.0-0-dev dh-autoreconfto install build dependencies - Then run
git clone https://github.com/rockchip-linux/rkdeveloptool.git - Change into the new directory using
cd rkdeveloptooland run:./autogen.sh./configuremake
- After the
rkdeveloptoolutility is built, you need to download a support binary by opening your browser and pointing it to: http://xogium.performanceservers.nl/archive/rockpi-s/u-boot - Click on the
rk3308_loader_uart0_m0_emmc_port_support_sd_20190717.binlink to download the support file (remember where it was downloaded to) - Next, hold the
MASKROMbutton down while connecting the RockPi via the USB-C serial port of your computer (wait for about 2 seconds before releasing the button) -
Next, tell the tool to load the support file by running (the path to your downloded .bin might be different)
sudo ./rkdeveloptool db ~/Downloads/rk3308_loader_uart0_m0_emmc_port_support_sd_20190717.bin -
Then, run
sudo ./rkdeveloptool wl 0 ~/Downloads/readinet/readinet-os-xxxxx.imgwhere the .img is the READI-Net OS image you downloaded and configured earlier - Finally, run
sudo ./rkdeveloptool rdto finalize the write and reboot the device.
-
Note
The device can take up to 3 minutes to complete its initialization routine
- No eMMC (SD Card only):
-
After initialization completes, there will be a wifi network that appears starting with
readinet-<DEVICE-ID>. (Each device will have a different ID) - Connect to the
readinet-<DEVICE-ID>WiFi network with a default password ofreadinet - You can then access the web interface of the device at https://10.42.0.1 and you will see something similar below.
Note
The SSL certificate may not be valid and your browser may complain, just accept the 'risk' to move to the web application.
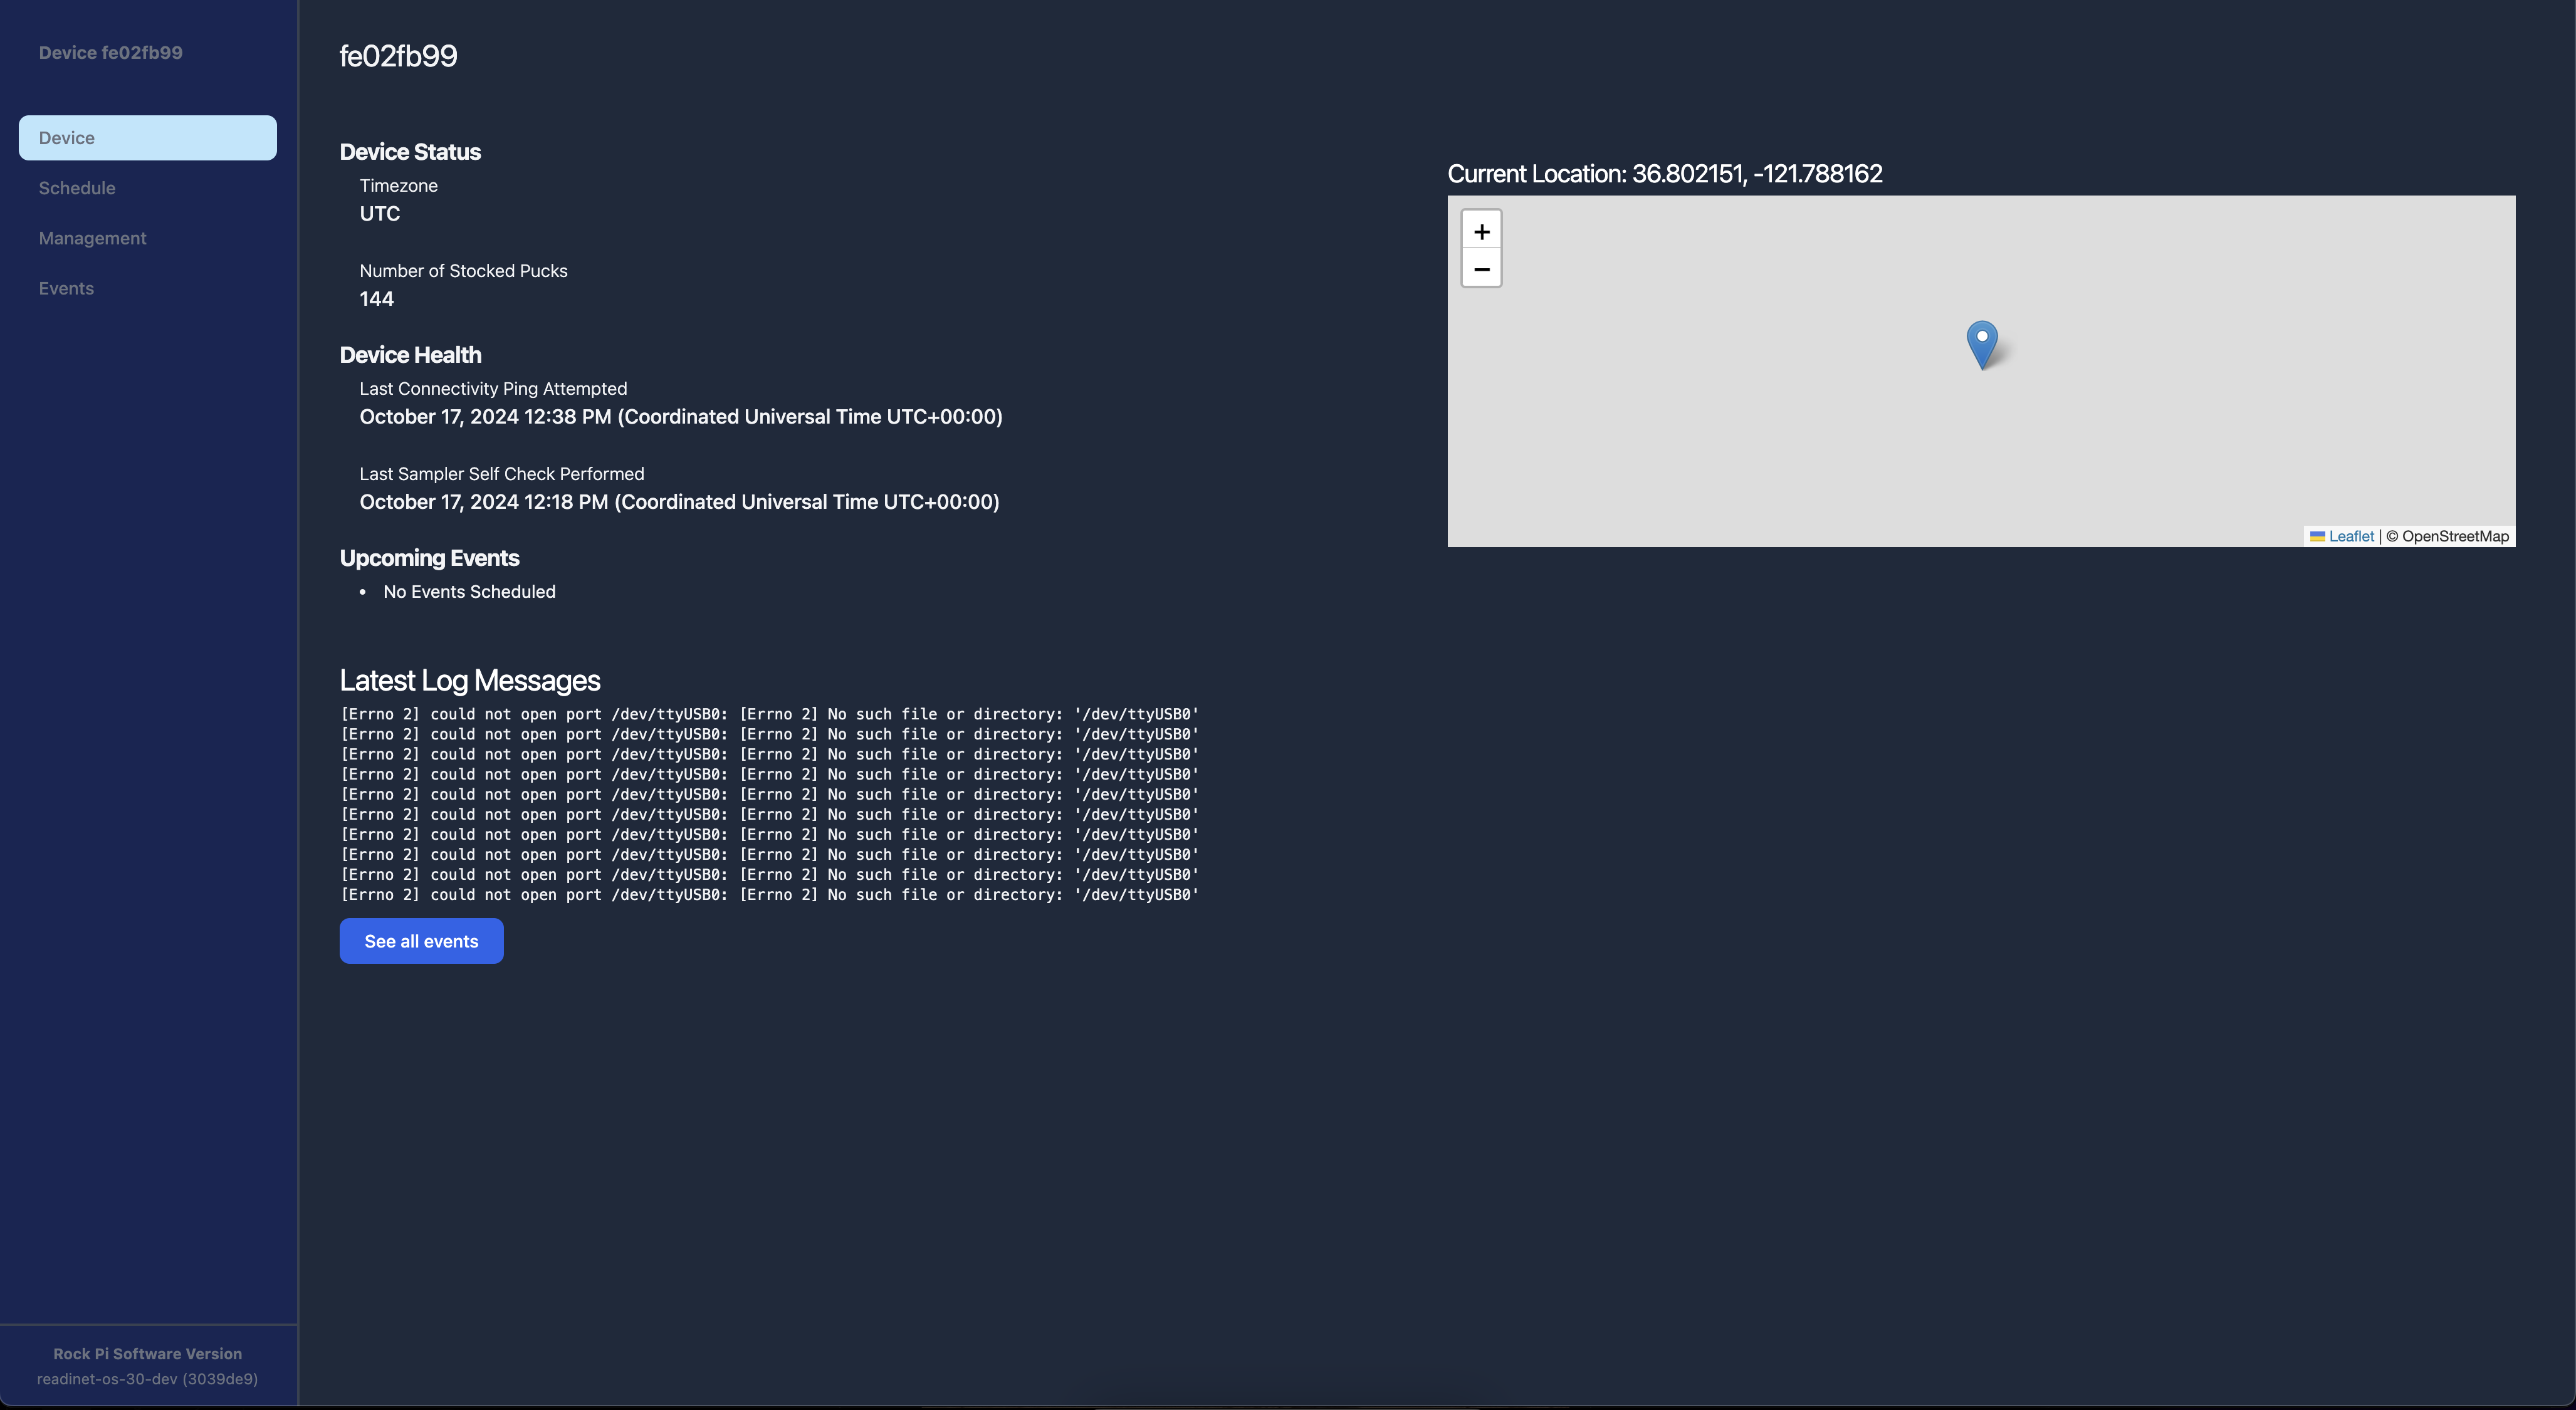
Note
If the uplink connection was not successful, the map does not show up in the application. That is to be expected.
Connect to the Internet
If the uplink was not specified ahead of time using the steps above, you will need to tell the device what WiFi network to connect to so that it can reach the READinet servers that are hosted in the cloud.
- Click on
Managementon the left menu of the device web page and then update theUplink Internetwith the WiFi network and password and then click onSave Changes(you will have to click outside of the boxes you edit to make theSave Changesbutton appear).
Note
When you save changes, it will likely drop your connection to the readinet-<DEVICE-ID> WiFi so you will have to reconnect to continue.
- That will connect to the device to the internet so it can talk to the wider world. (The map should then appear on subsequent page navigation).
Connect Device to Cloud VPN
In order to connect your device to the remote cloud management service, you will need to place the device inside the server Virtual Private Network (VPN). FIDO uses headscale/tailscale to enable this VPN so you first need to tell the tailscale instance running on the device what VPN you want to join.
- If not already connected, connect to the
readinet-<DEVICE-ID>wifi using the steps above. - Next, SSH into the device with
root@10.42.0.1. The password isreadinet. -
Initiate a vpn connection by issuing
tailscale up --login-server https://vpn.prod.readinet.org(ortailscale up --login-server https://vpn.dev.readinet.orgfor the development server)
-
The command should respond with a URL that you can copy and paste into your browser which will then give you further instructions on how to command the server to accept the device into the VPN.
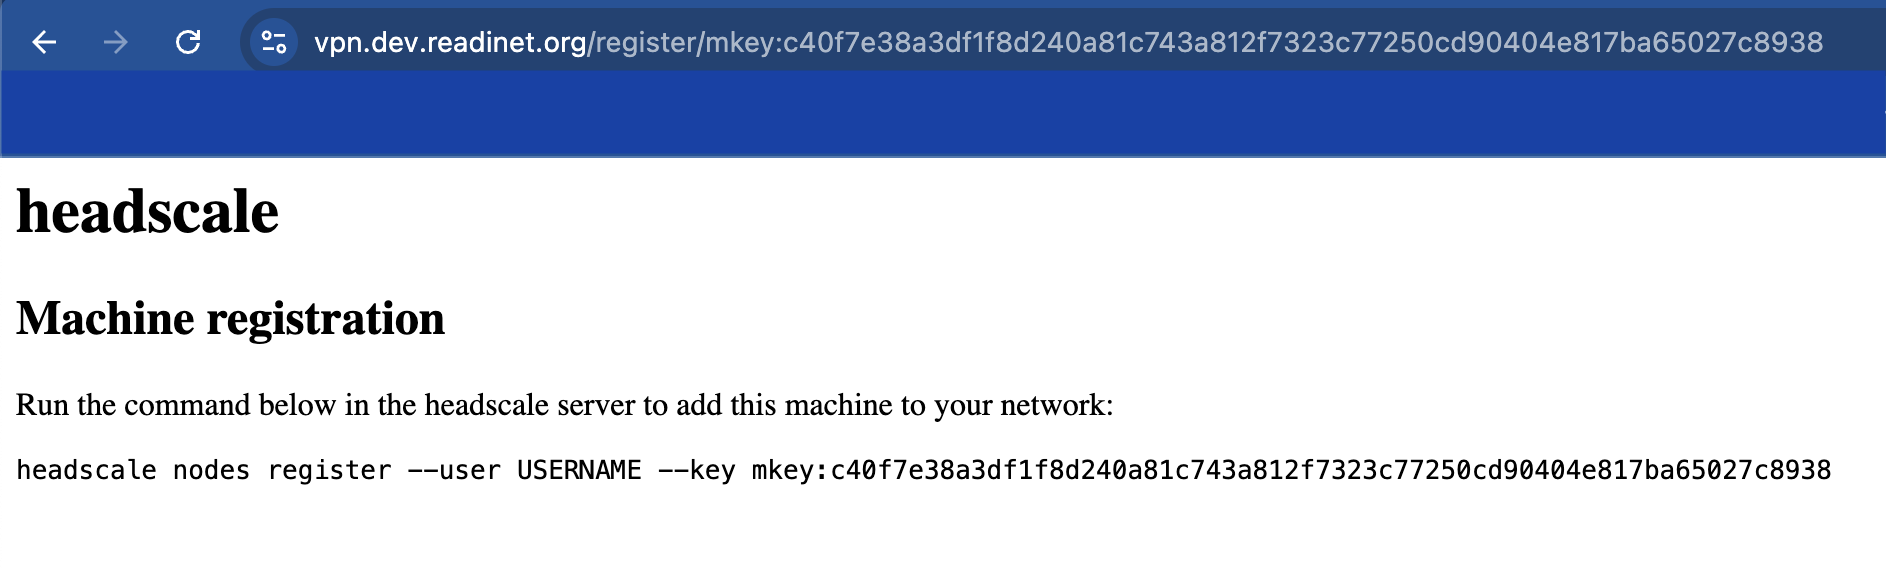
-
You can then ssh into the cloud server using
ssh admin@prod.readinet.orgorssh admin@dev.readinet.org - Once you have ssh'd into the server, copy and paste the command that was in the web browser from a couple of steps ago.
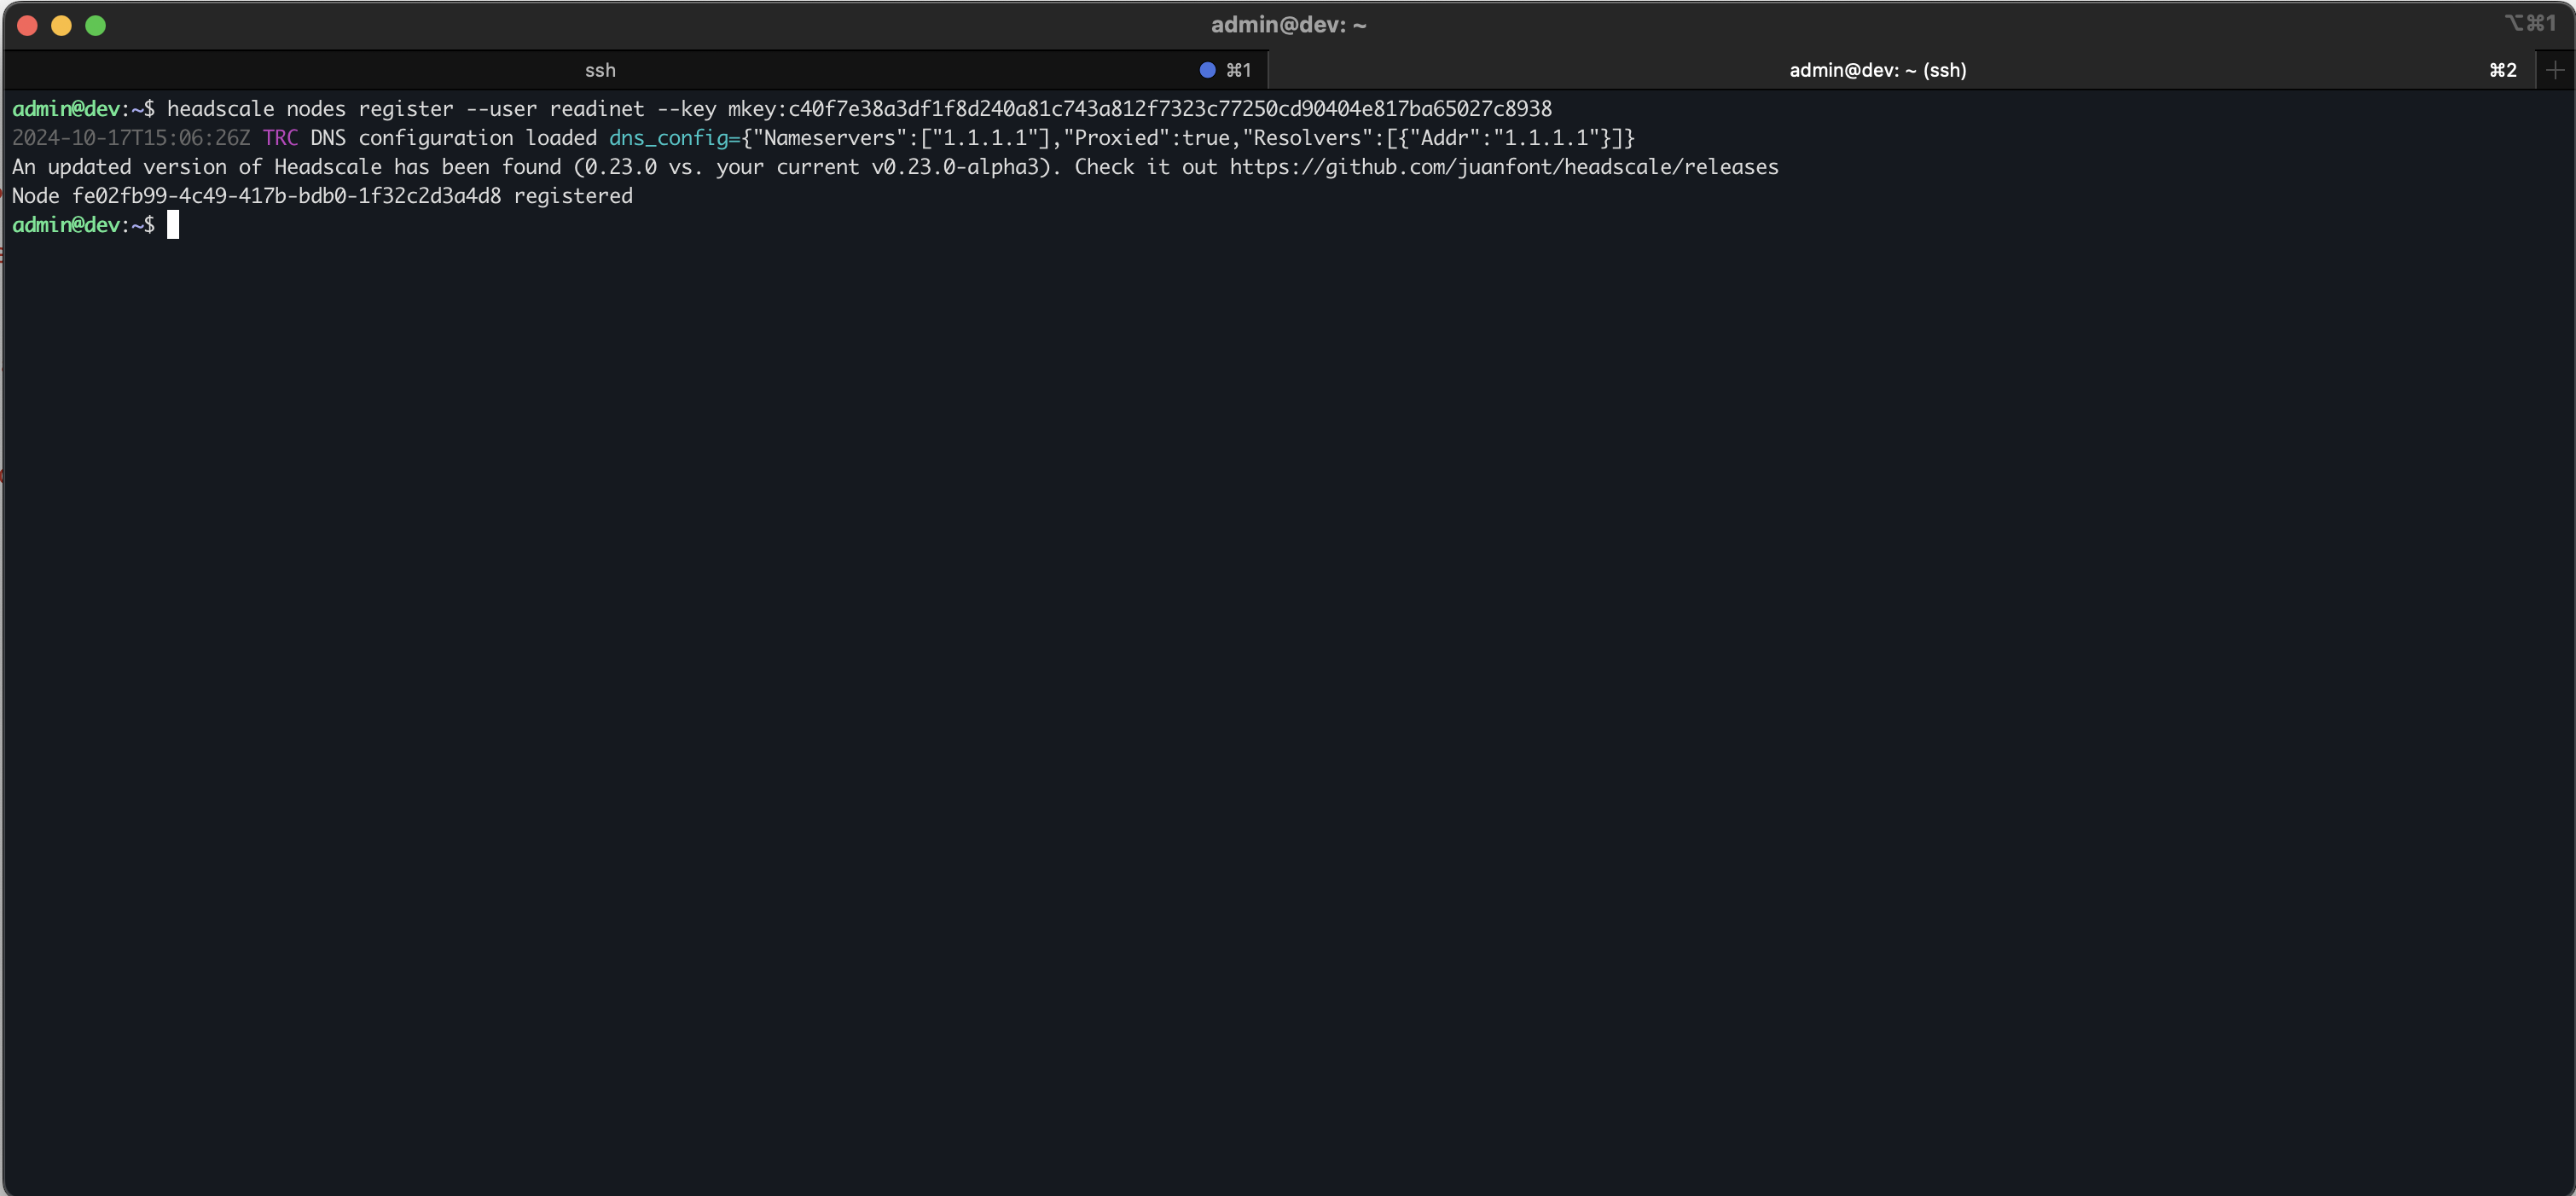
Note
You need to change the USERNAME to readinet in the command before running it
-
You can verify the device was added by running
headscale nodes list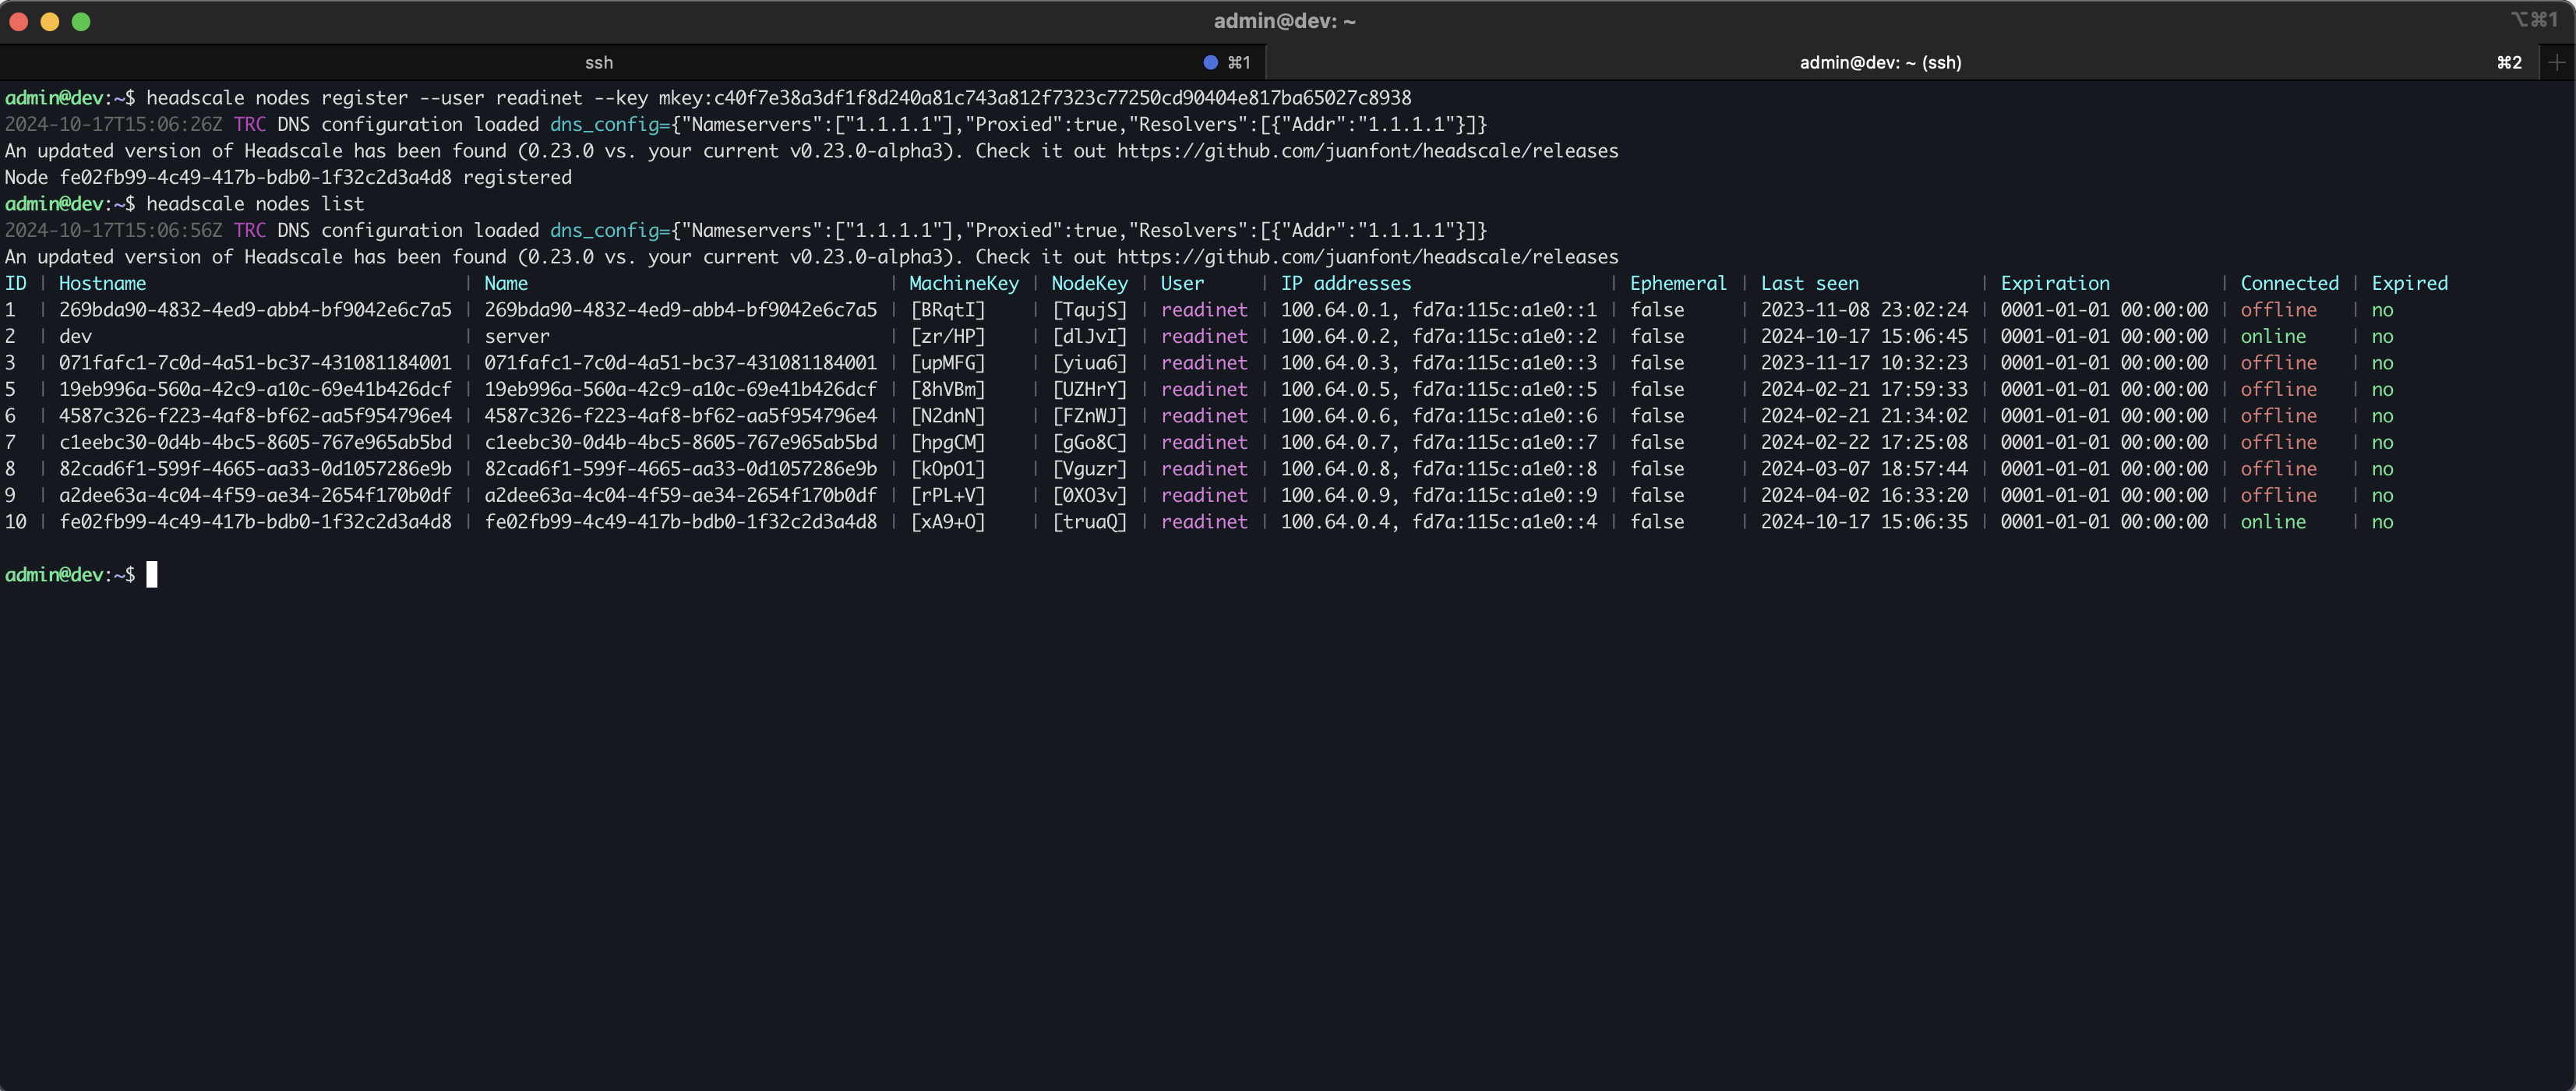
-
Back on the device (connected via SSH), restart readinet-web with
systemctl restart readinet-web.
Note
Any time you change the VPN configuration, you must restart readinet-web, otherwise sync events won't work.
- On the device via ssh, VPN connectivity can be verified by issuing
tailscale statusor by pinging the server through the VPN withping server.readinet.local
Warning
There are two separate VPNs: Dev (vpn.dev.readinet.org) and Prod (vpn.prod.readinet.org). You can only be connected to one at a time.
Add Device to the Organization
The last step in bringing a new device online is you need to add the device to an Organization. The server is aware of the device now that it is part of the VPN, but it doesn't know which organization owns the device.
- If not already connected, connect to the
readinet-<DEVICE-ID>wifi using the steps above. -
On the cloud web application, select the organization you want to add the device to and make sure you have selected
Deviceson the left navigation menu. You may see some devices already, but you shouldn't see the device you are trying to bring up yet.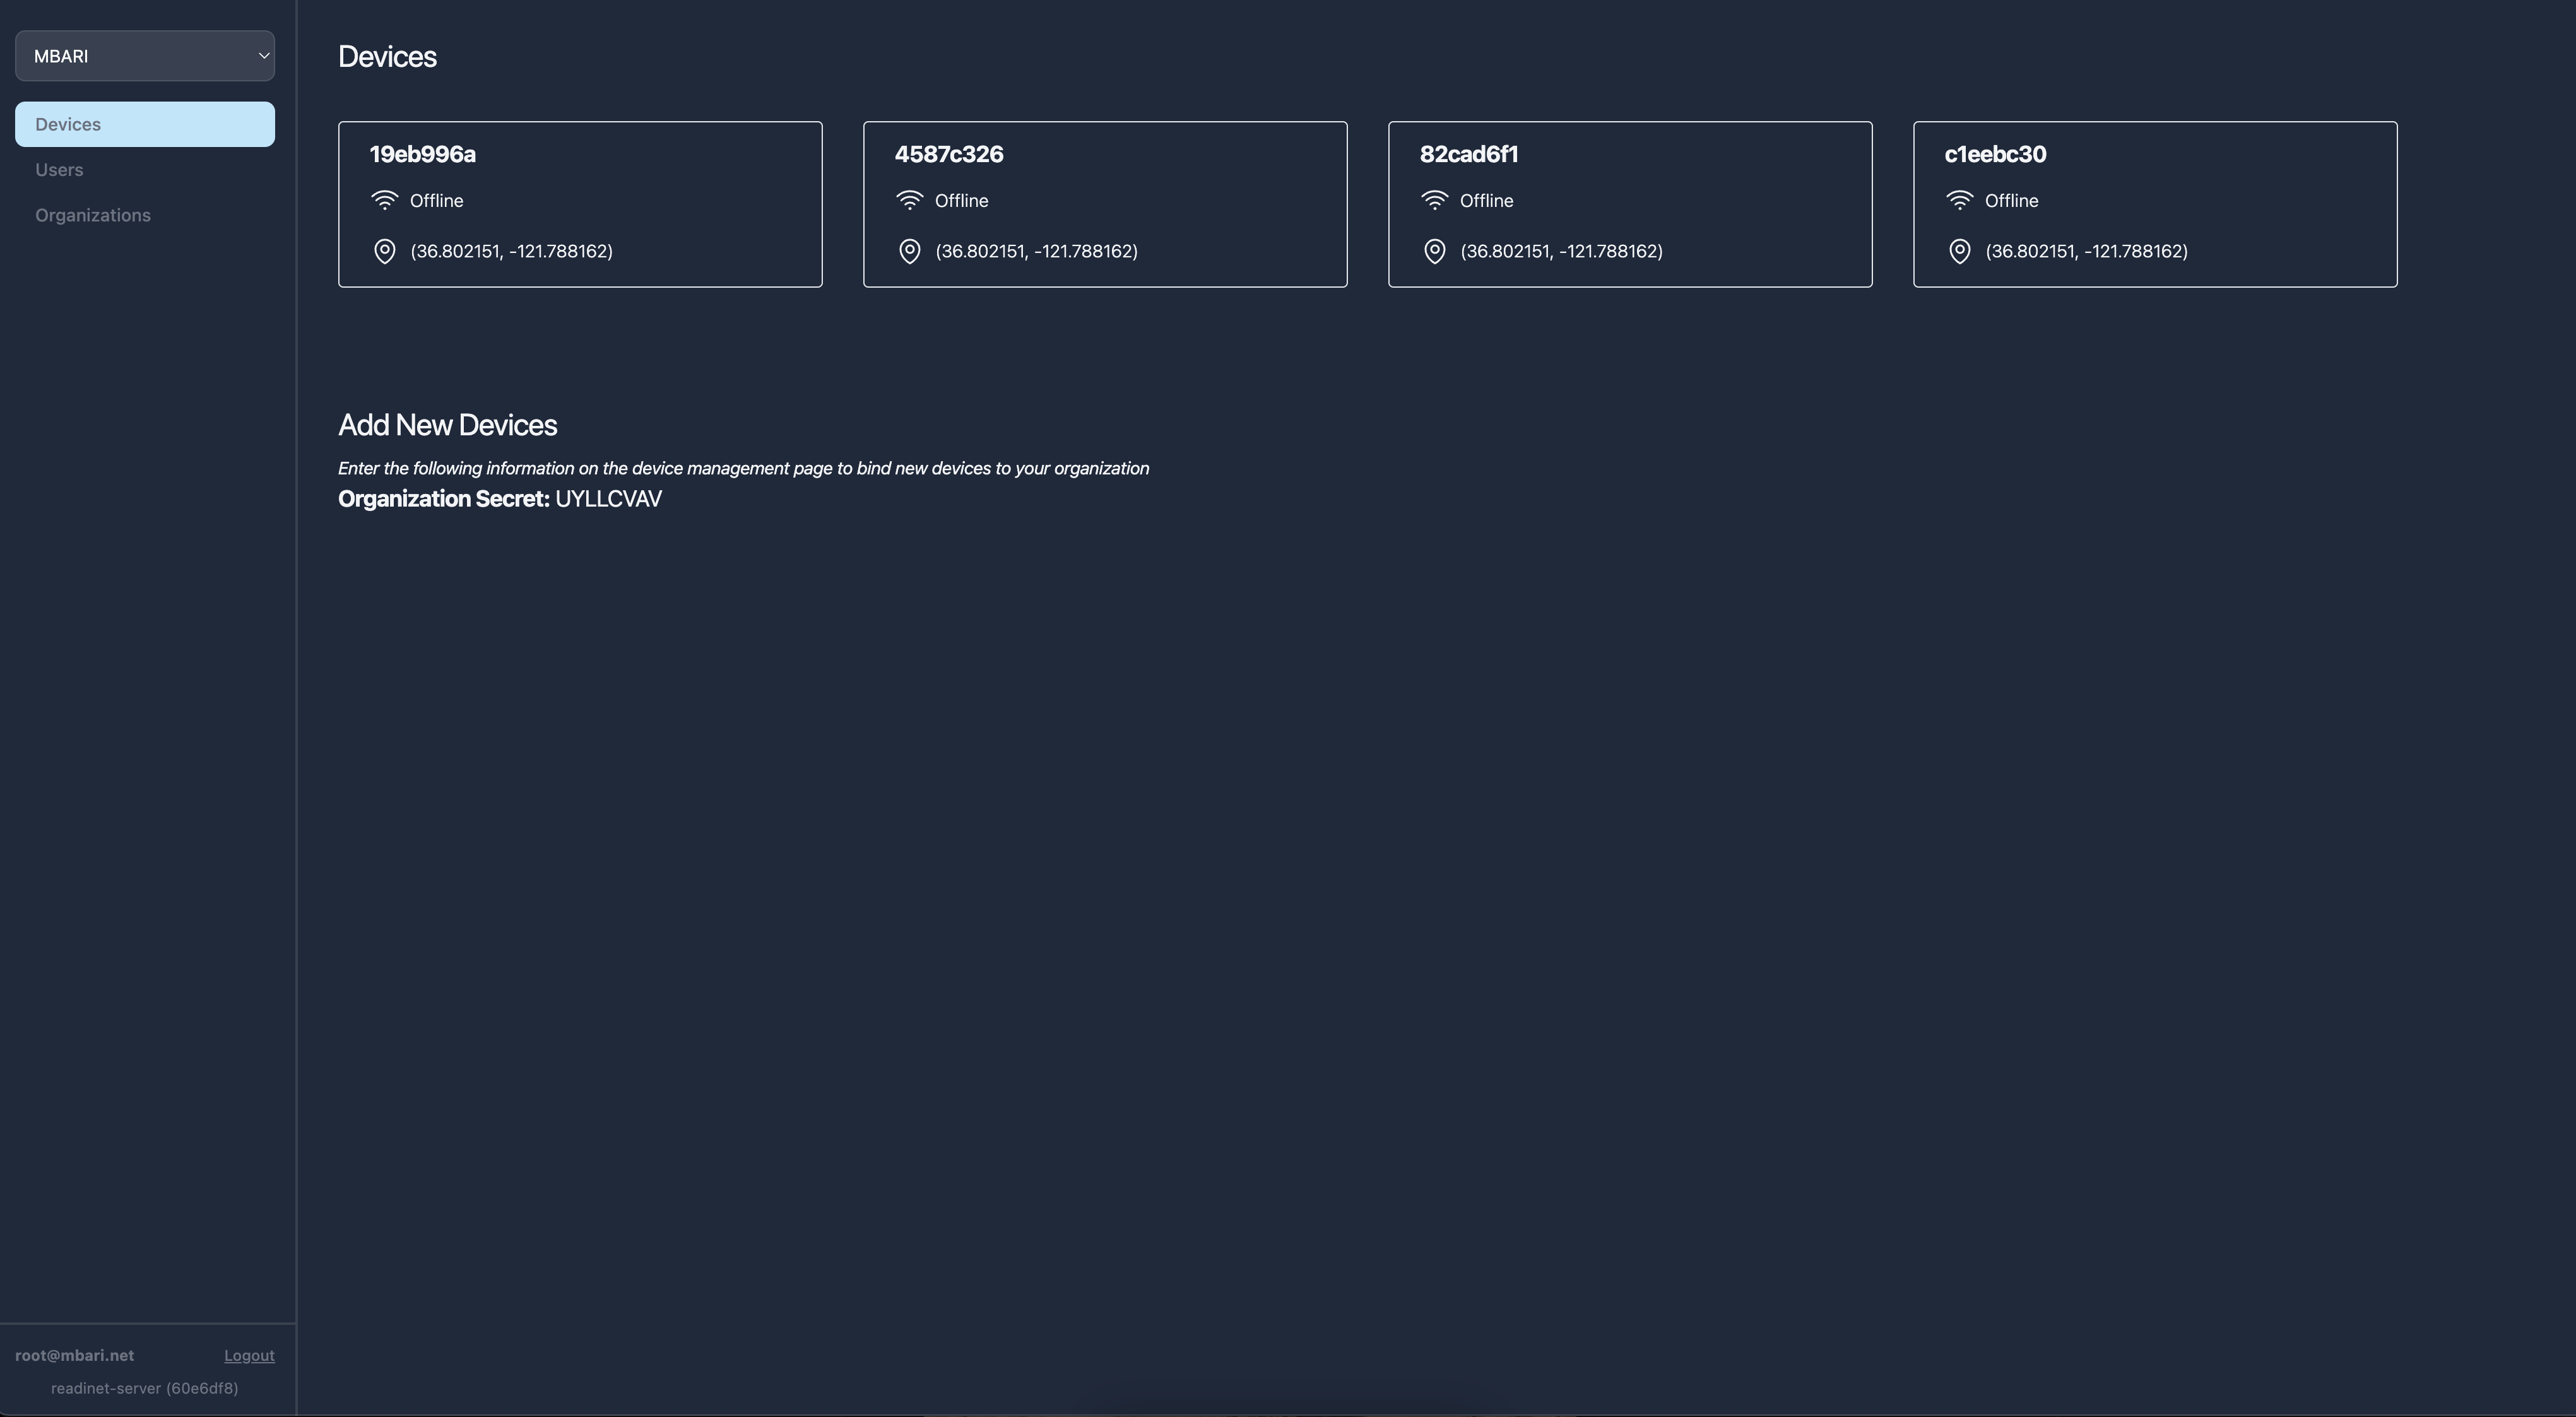
-
Under the
Add New Devicessection of the page, select and copy theOrganization Secret. -
Next, go the local device web application at https://10.42.0.1
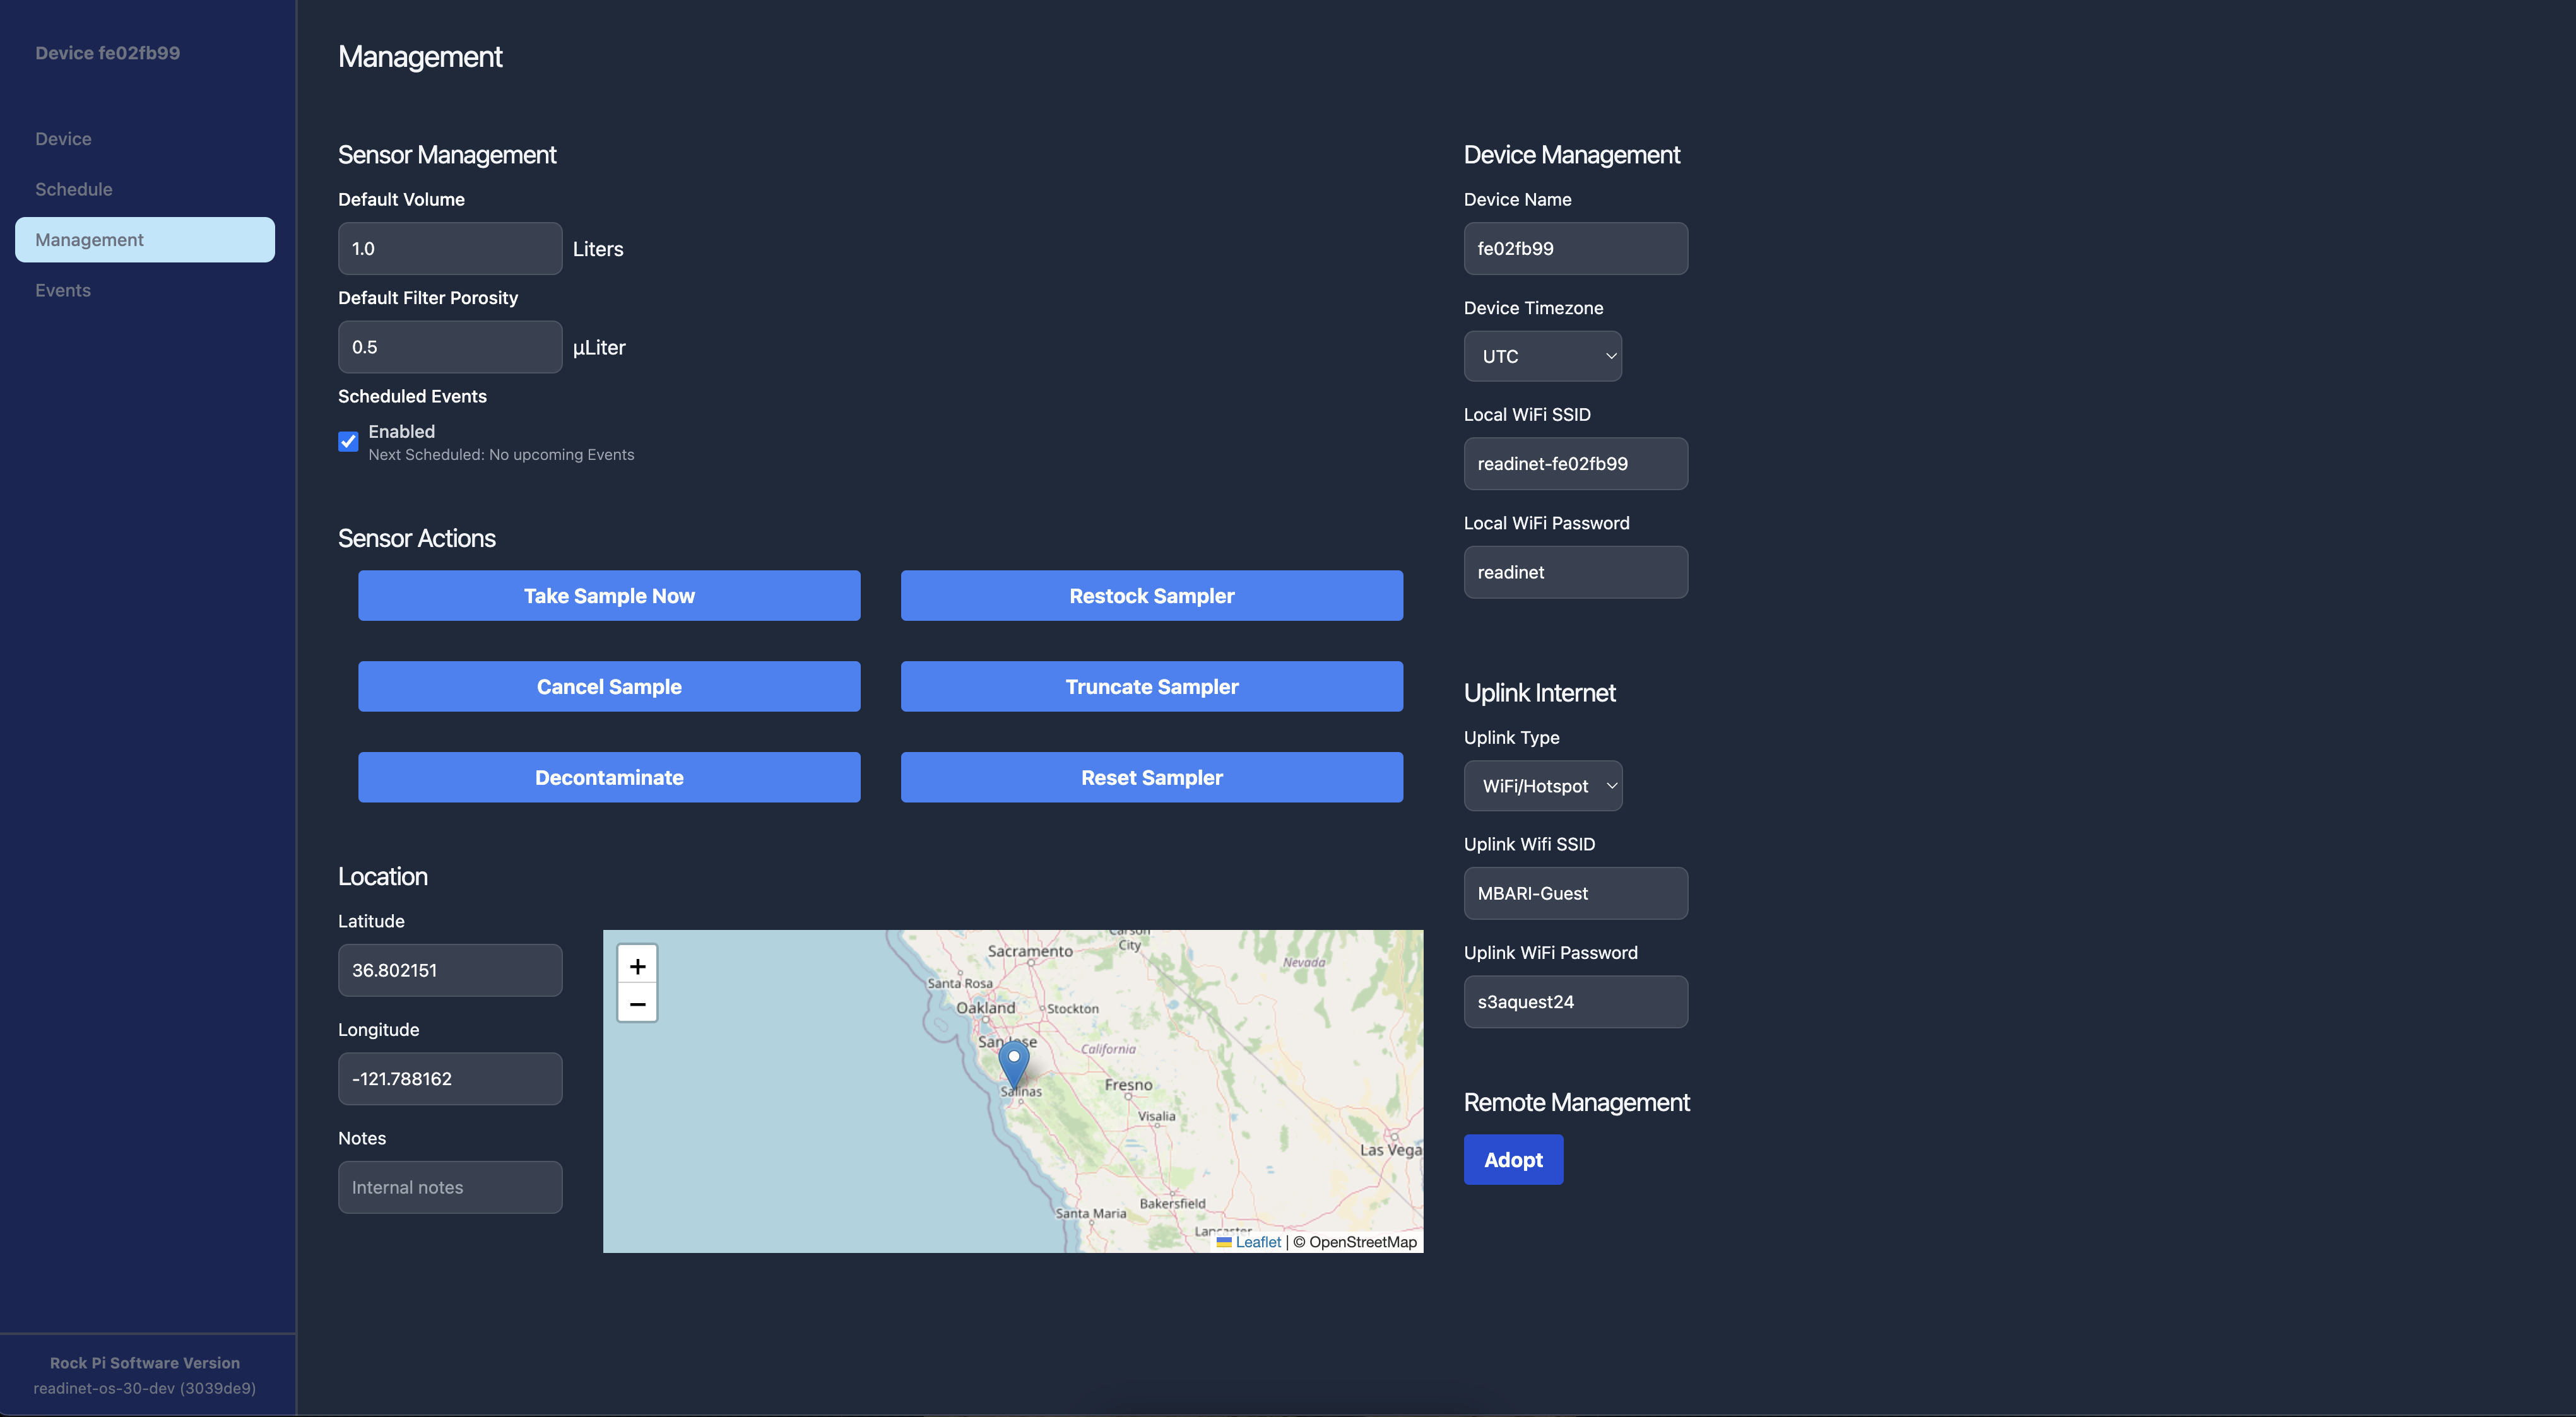
-
Click on
Adoptand paste in the Organization Secret you copied and click on Save (or something like that). You should then see a notice that it was added to the organization.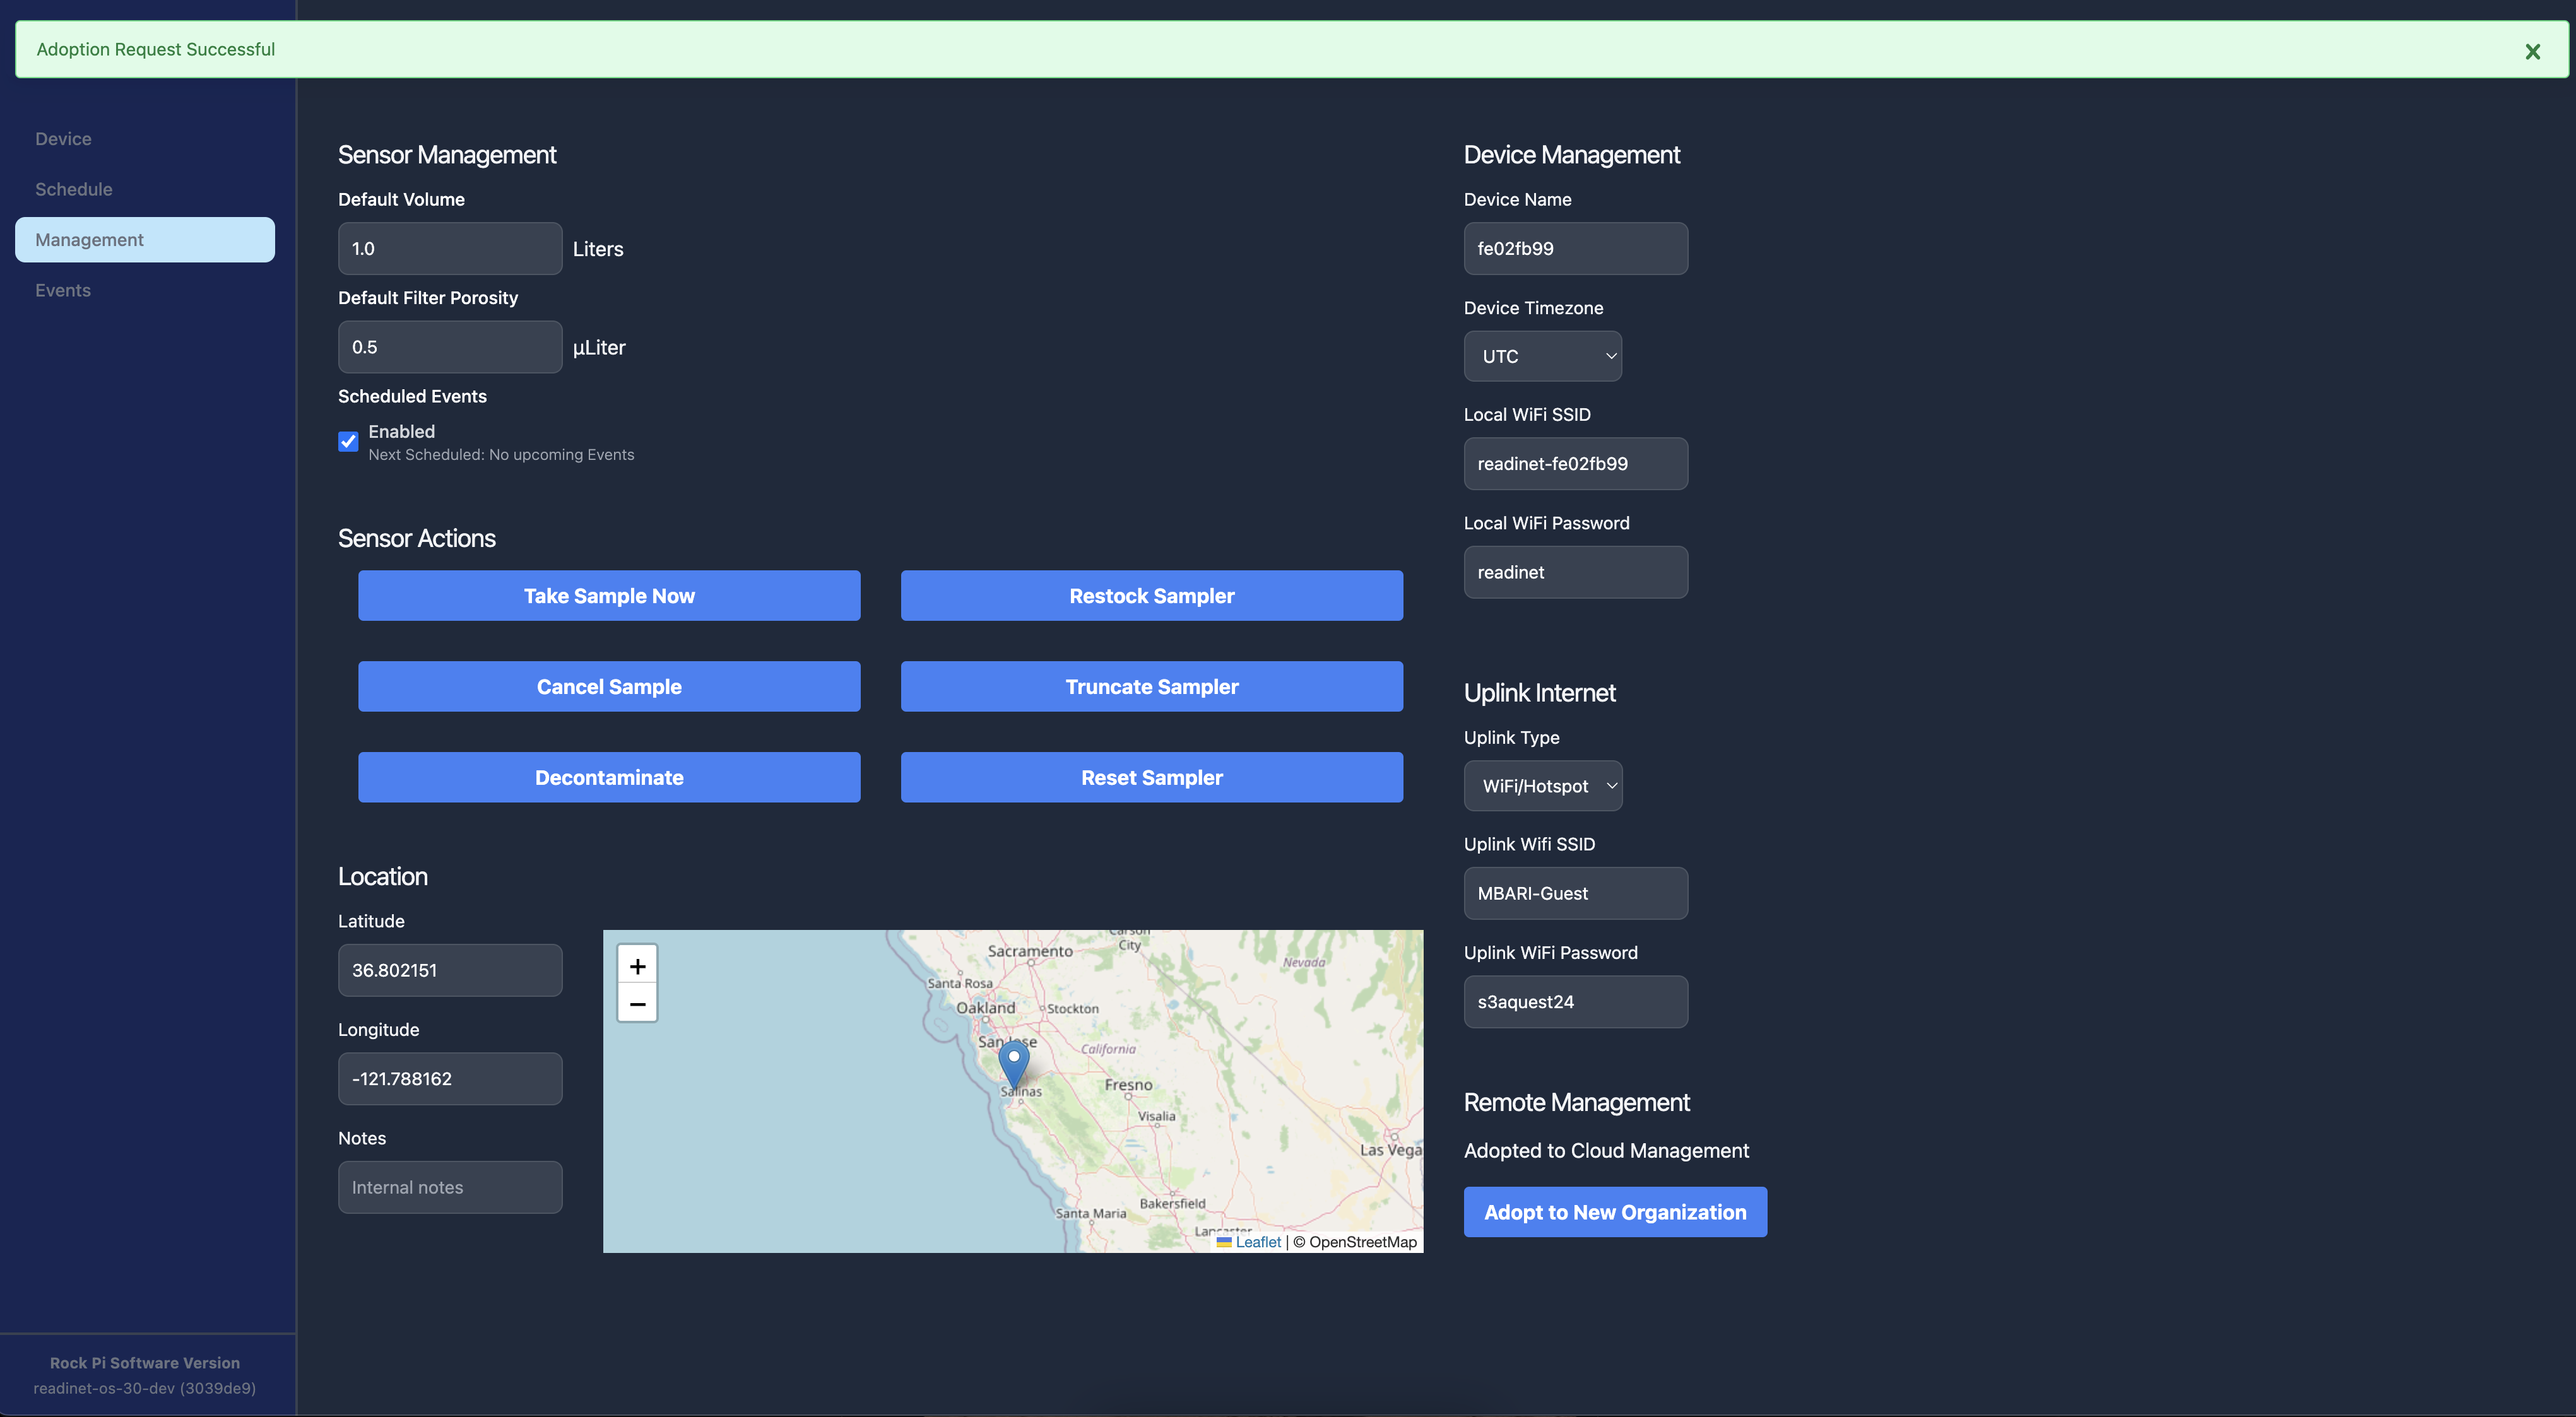
-
Back on the cloud web application, if you refresh the
Devicespage, you should now see the new device and it should show that it is online.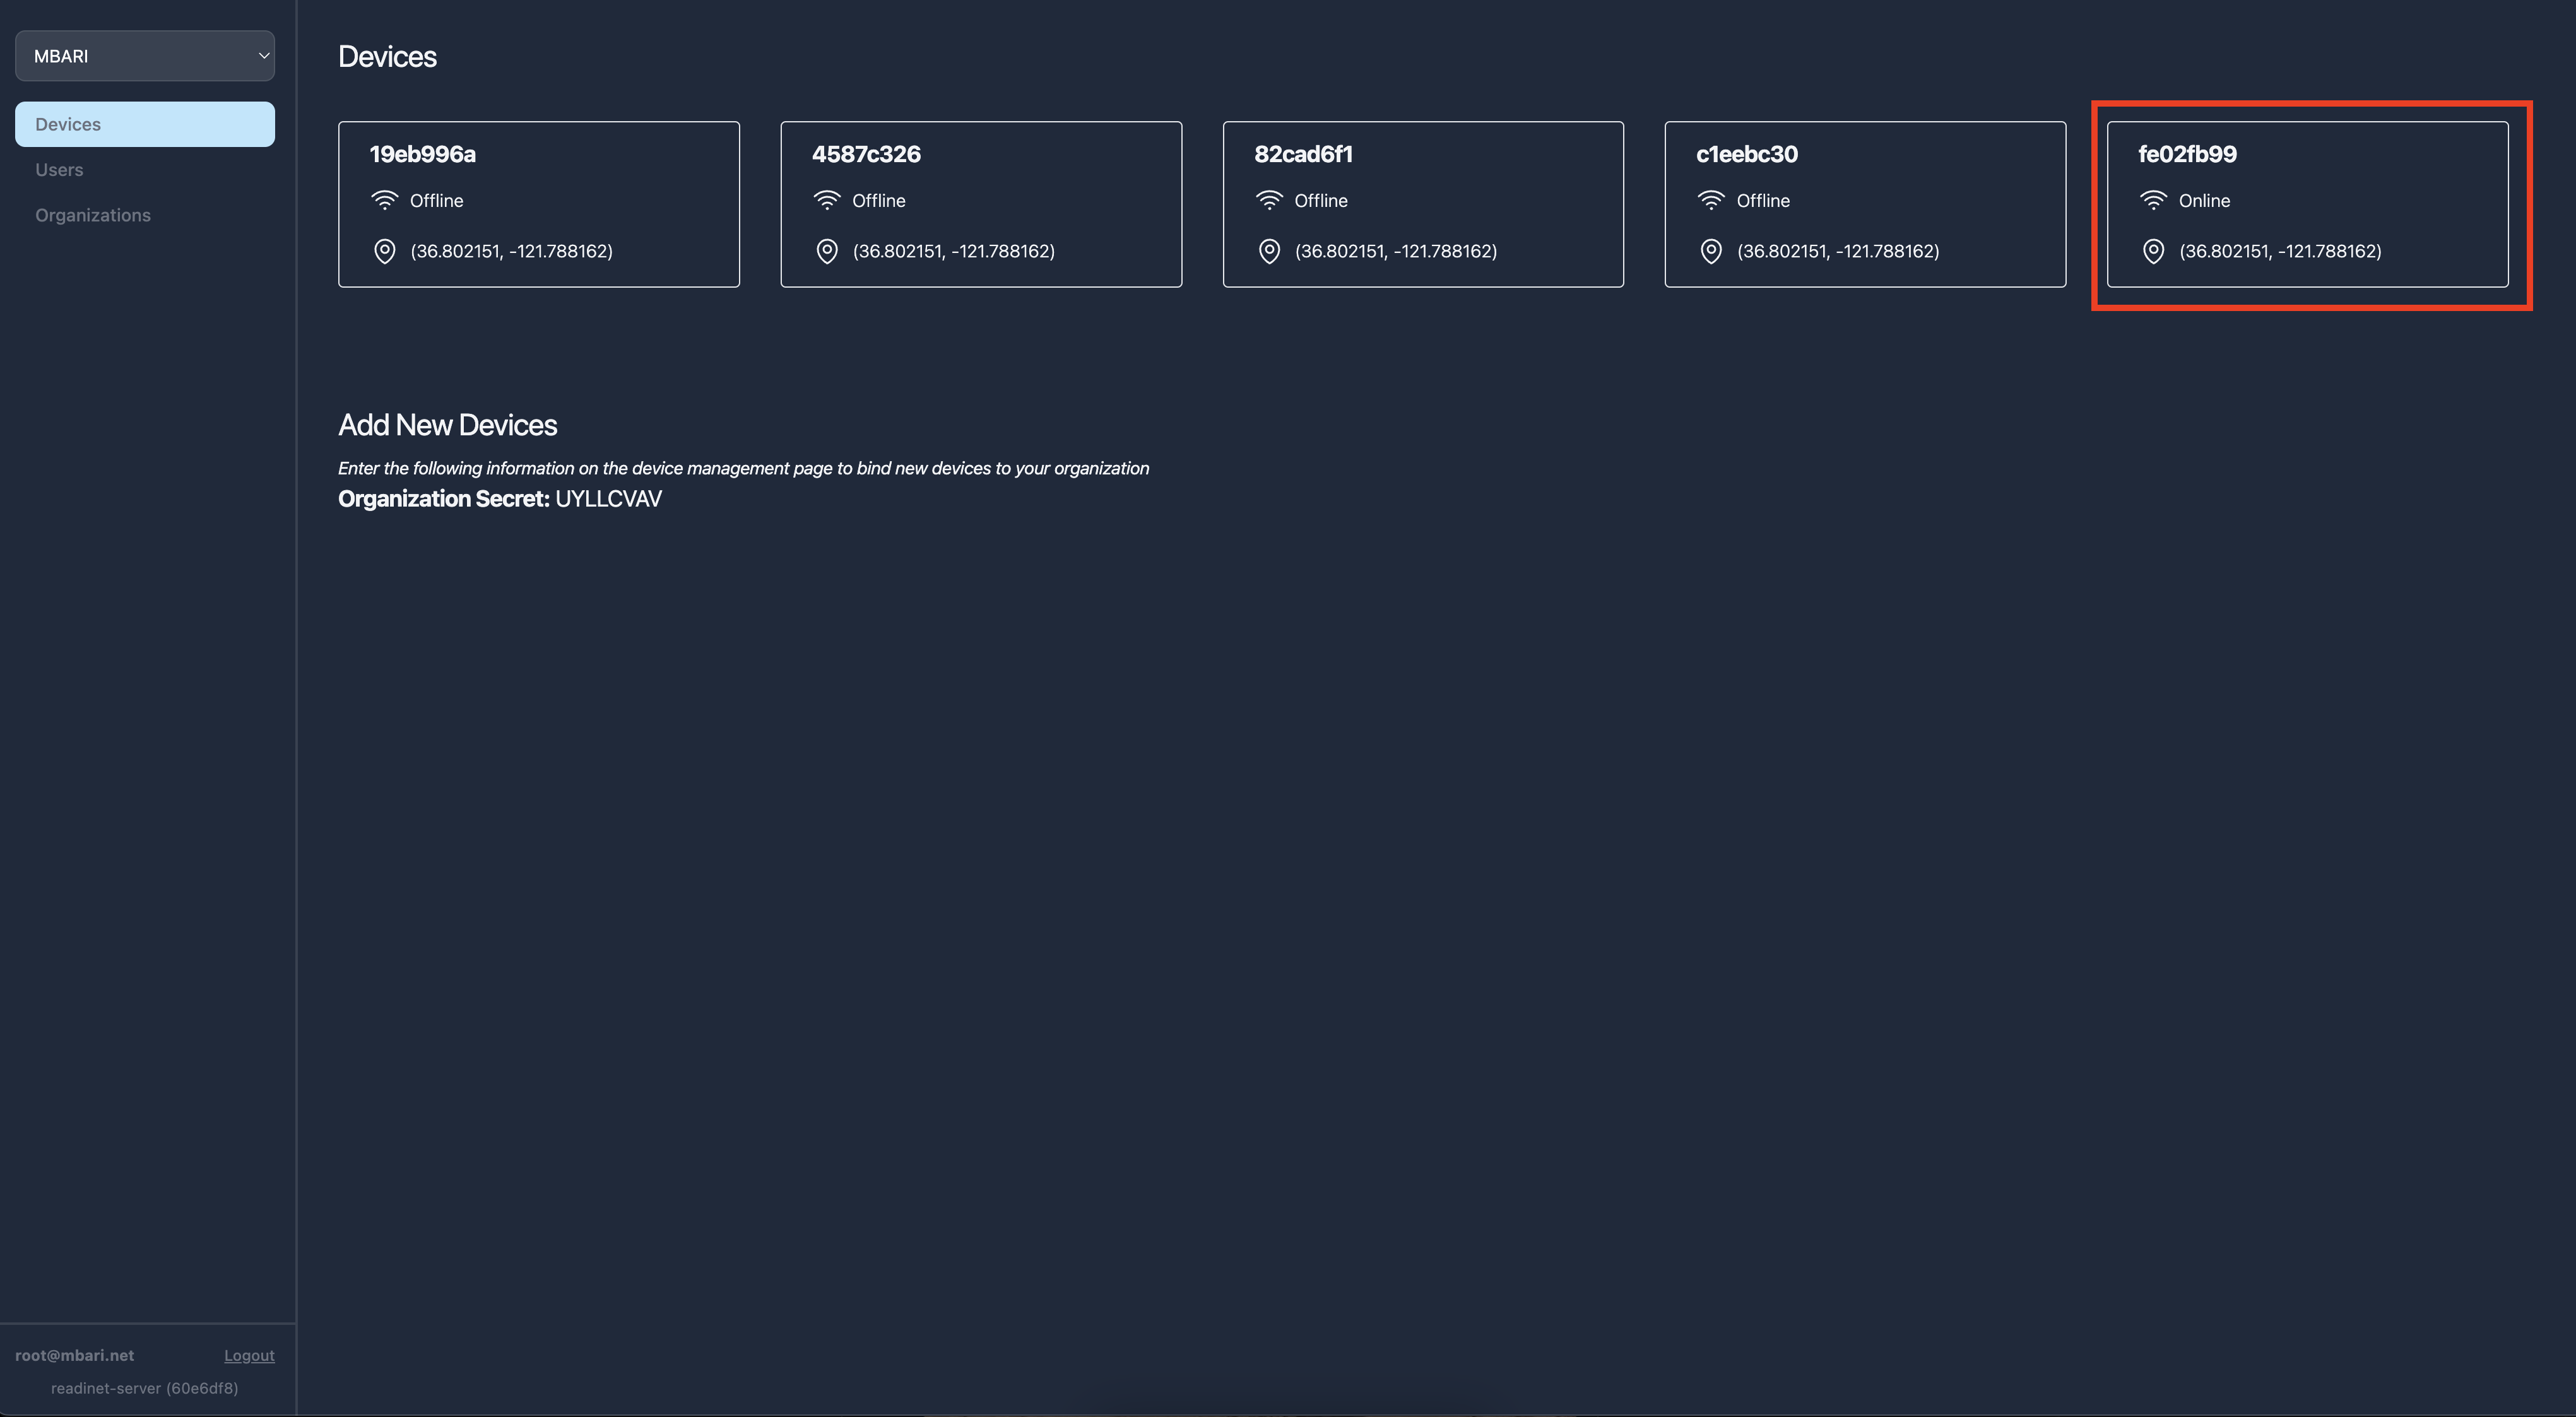
Configure the device
While not common, there may be times you need to change the configuration on the device itself. Here are some instructions on how you would do that.
- If not already connected, connect to the
readinet-<DEVICE-ID>wifi using the steps above. - SSH into the device using
ssh root@10.42.0.1. The default password isreadinet - The main configuration for the web interface is found in
/opt/web/.env. You can edit the file by issuingvim /opt/web/.envornano /opt/web/.env - After making changes, you must restart the interface by issuing
systemctl restart readinet-web
The configuration options are as follows:
SAMPLER_TTY: The device location of the sampler on the linux box. Should start with/devSAMPLER_BAUD: Baud rate for the sampler serial connection. Should be a positive integer.SAMPLER_TIMEOUT_SECONDS: The number of seconds before a sampler operation would be cancelled. Note: this value can be overridden in code for some sampler operationsSAMPLER_SELF_CHECK_SECONDS: The number of seconds between running self checks for the sampler. This will temporarily lock the sampler.CONNECTIVITY_PING_CHECK_SECONDS: The number of seconds between sending heartbeat pings to tell the server that the RockPi is online.THIS_DEVICE_ID: The unique identifier for the device. This should match/etc/machine-id. Changing this value is not recommended.APP_VERSION: The version of the application displayed in the lower left hand corner of the interface. Generated through the OS build process.MQTT_BROKER_URL: The location of the MQTT Broker. In normal scenarios, it should beserver.readinet.local.ROLE: The role of the system. Must be eitherdeviceorserver. There should only be oneserverin the deployment.SECRET_KEY: This is a web-server specific item to deal with cross site forgery. Do not change this valueFLASK_ENV: This is signifier for what environment the application is running in. It should beprodunless otherwise specified.SQLALCHEMY_DATABASE_URI: A sqlite URI that points to the database in useREMEMBER_COOKIE_HTTPONLY: A web-server specific itemSESSION_COOKIE_SAMESITE: A web-server specific itemRUN_BACKGROUND_THREADS: Background threads provide MQTT-syncing and device status reporting. This should betrueunless debugging.APP_VERSION: A text string that will get displayed as the current version. This should be automatically templated from the OS build.